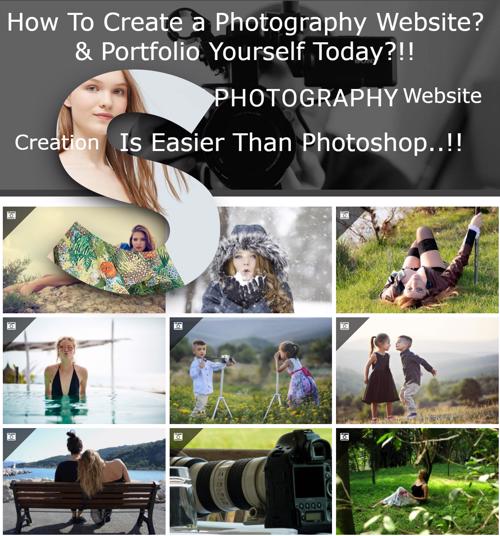
Do you want to create your own photography website? You don’t need to worry about having any technical skills even to build a highly professional photography portfolio website. In fact, it is easier than Photoshop..! If you want to make an amazing photography, portfolio or any photography related website, then you are in the right place. Just follow this post to create your dream website using the latest technology.
After reading the first section of this page, you can make a Typical or General Photography Website & Portfolio. If you follow this entire page, then you can do anything including selling photos online from your website in America and worldwide, creating an art store, inserting a booking system, creating your studio business website, making money from your website using Google Adsense or other ad networks, showcasing an amazing 3D portfolio, photography blog, tours, inserting an Instagram feed on your website, all social media stuff, promoting your photography brand, etc. You can even sell photo prints on different things in the USA, as well as worldwide with automated deliveries from your website with no previous skills required!
Do you want to make one exactly like the New York #1 Photographer Brandon Stanton website?

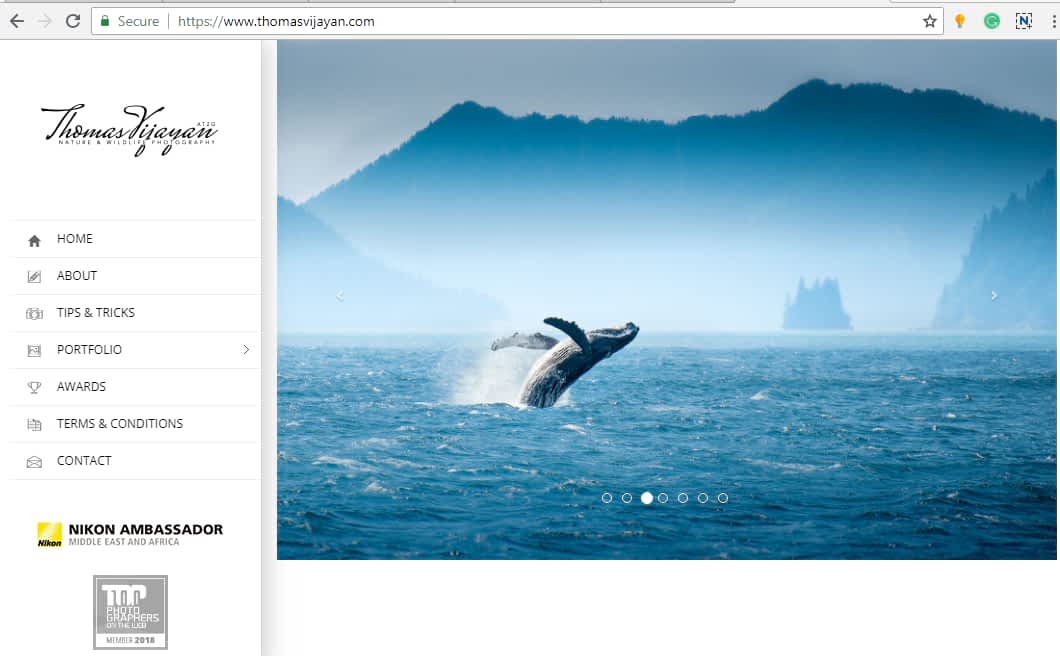
or Thomas Vijayan website?
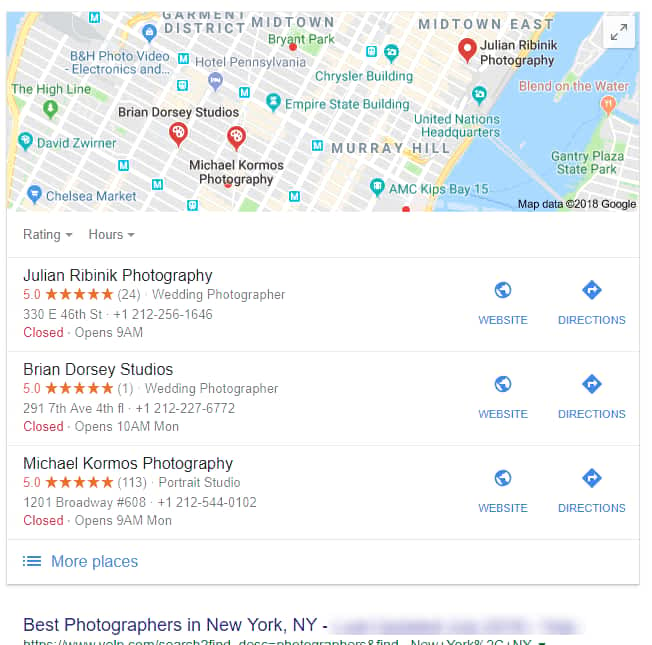
Or any American-style website or any popular photographers like Said Mhamad, Mario Testino, Murad Osmann, Paul Nicklen, Chris Burkard, Steve McCurry, Clark Little, Terry Richardson, Katie Orlinsky? Or best photographers in New York like Michael Kormos Photography website or David Noles Photography website? Or any general photographer’s site in your area?
(Note: If you own a good website, then your studio name will come first on Google even you don’t get enough reviews)
Or want to create a niche photography site which only focuses on travel photography? Wedding photography, pregnancy photography, fashion photography, food photography, architectural photography, candid photography, documentary photography, landscape photography, night-long exposure photography, conceptual/ fine art photography, portraiture, sports, street, war, wildlife, photo-journalism, photo-blog. Want to include everything?
Yes, you can..! Once you have followed one of the methods on this page, you can make any type of website within a day!
You can build a great website as far as your own imagination, creativity or dreams allow.
On this page, I’ll guide you through the best 2 methods to make your own photography website, step by step. You won’t need any other web design tutorial, as there are just these 2 methods.
(Choose your preferred method)
- The first method is very easy. You can make a website A-Z within 50 minutes. It is quick and easy. No Skill is required. It is easier than Photoshop. You can learn, create, publish, run, client proofing-management, sell photos, frames, printing on anything and start to promote within a day.
- The 2nd method is more advanced, so a little bit more difficult than the first one. You can do almost anything you like..! No coding skills required. But you may need 3 to 6 days to get familiar with it.
How This Tutorial Will Help You?
- You can sell photos, prints, frames, creating image management, client galleries, photo proofing, promotion, an amazing portfolio, and everything a photographer requires using the latest technology. You don’t need any coding skills to do this and it is easier than you might think.
- These ways are the best methods in the world. So you don’t need to worry about the end-website & technical aspects.
- On this page, I showed you how to create your photography website using different methods. So can choose the one that benefits you the most.
- Millions of websites have already been created using these methods..! So you don’t need to worry about reputation or trustworthiness.
- I explained step by step with no step skipped, so everything will be clear.
- If you have any problems, you can comment below and get a response within 24 hours directly from the author or send your problem to the contact page. so no fear.
Now forget everything, Just follow this tutorial
Okay… Let’s begin with the first method
#Method 1:
Wix Photography
Wix is the easiest true 100% drag-and-drop website builder in the world. No other website builders are easier than Wix for beginners. If you want a quick and easy website builder, then Wix is the perfect choice for you.
Wix integrated a separate section for Photography. This motivated many top photographers to create their website using Wix.
Try & Edit Wix Photography Templates For Free
Let’s see how to make a website using Wix, step by step.
1. Create An Account on Wix & Pick a Photography Template
Required Time:-30 → 40 Seconds
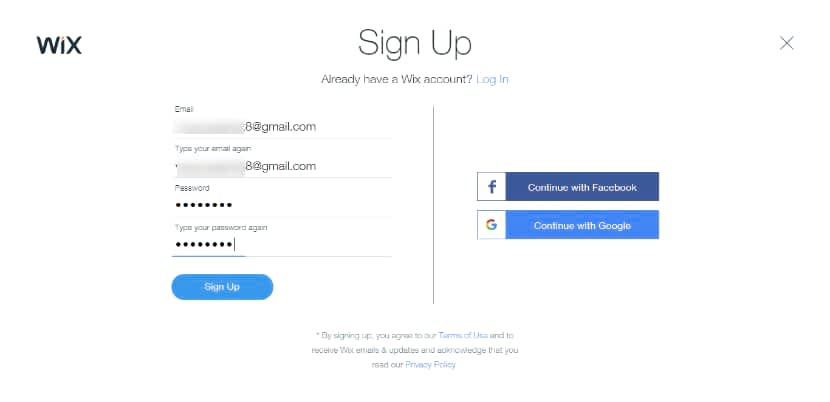
Go to Wix Photography, then Click Get Started & Create an account.

Enter your email & password or sign up with a Google or Facebook account.
After signing up, sometimes Wix shows you two options like this. Choose Wix Editor – Choose a Template

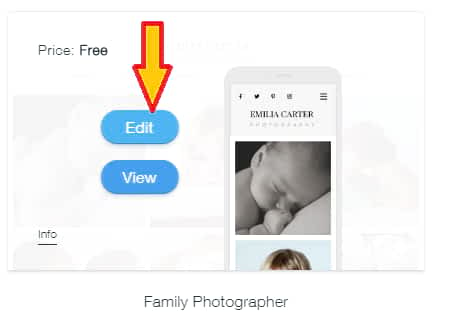
Next, you will be asked to pick the photography website template you love. Don’t think too much and waste your time. Because it is 100% drag and drop, so the template doesn’t matter. You can modify it later.
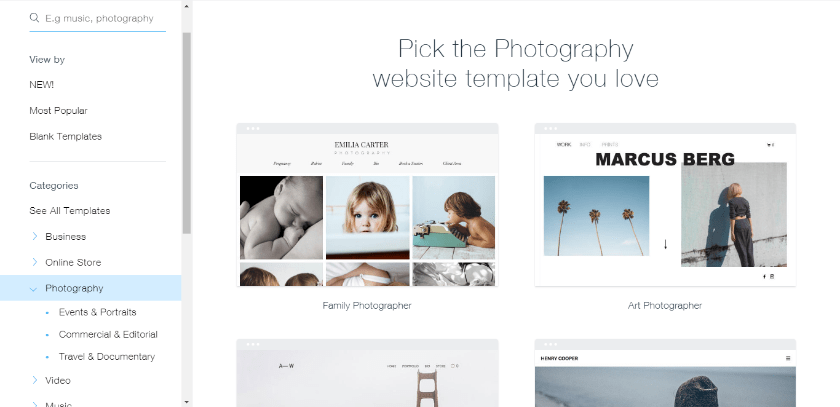
Just hover on the template, Then you will see Edit or View. Click Edit.
Once you have clicked on edit, it takes a few seconds to load the site builder editor. Wait until it is loaded. Once it is loaded, it will show you a 2-minute video tutorial. You must watch that video.
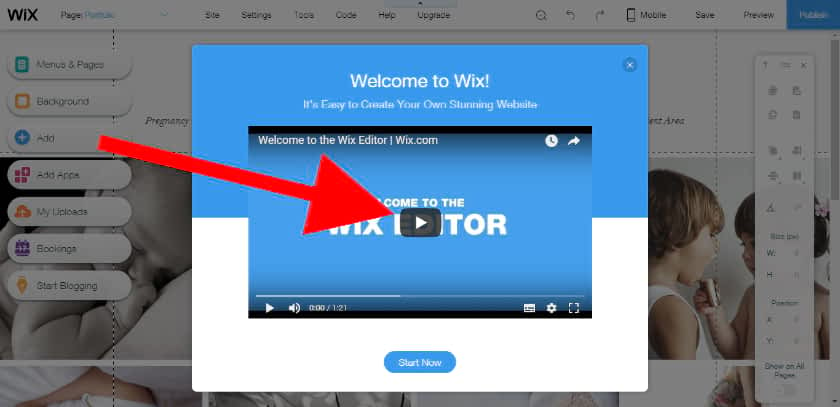
After watching the video, click Start Now. You will then see the site builder editor.
2. Edit The Photography Template
Here is the screenshot of the editor.
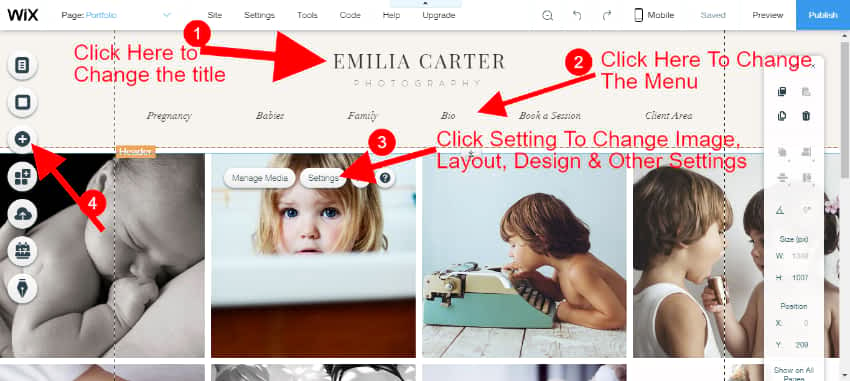
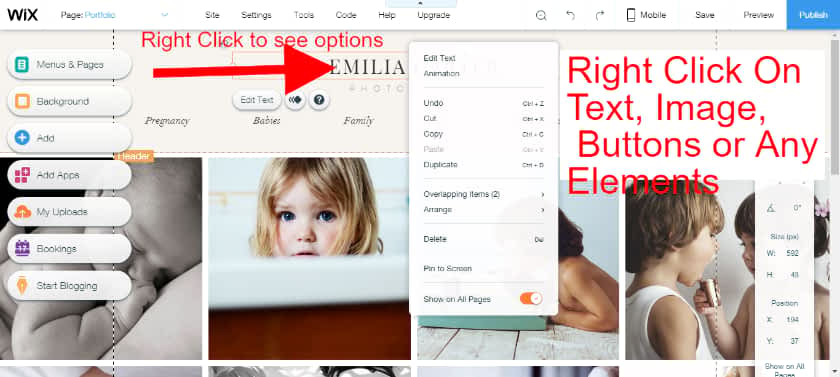
- Click on the text ⇒ Delete the old text ⇒ Edit the text you want.
- Click on the text (or any elements like images, button etc) ⇒ Right click ⇒ You will see all options like edit text, Animate, Overlapping items and more. See screenshot below.
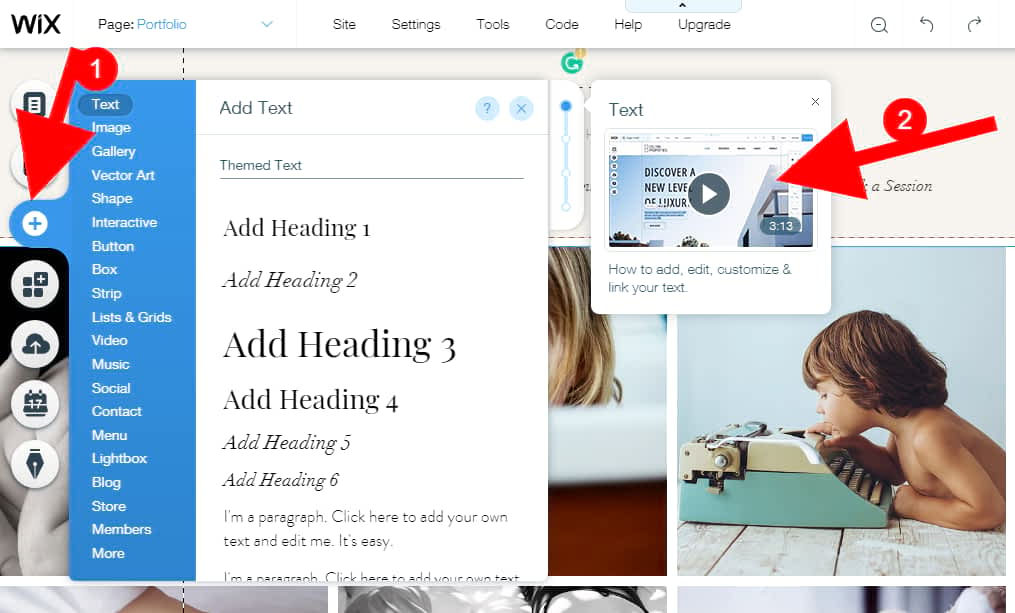
Now start to build your own website using ready-made drag and drop functions.
Click Plus (“+”) Button to add web elements like text, image, button, gallery, a contact form, menu, video, music, blog, payment system or click more for 100’s of web apps for your website. I highly recommend you watch all the videos on the site editor.
- Click on More (at the end) and see hundreds more amazing functions.
- You don’t need to learn anything.
- Just click which function you want.
- This will add to your webpage automatically
- Then you can drag and drop to change its position.
- Within each function (there are hundreds), you can customize exactly how you want.
- You don’t need to worry about anything. Here you will get everything. Your business will flourish from a great website costing you nothing.
- You can change or add any images.
- You can change the background with stunning designs. There are hundreds of wonderful, exciting background design collections.
- You can also change the color of each design.
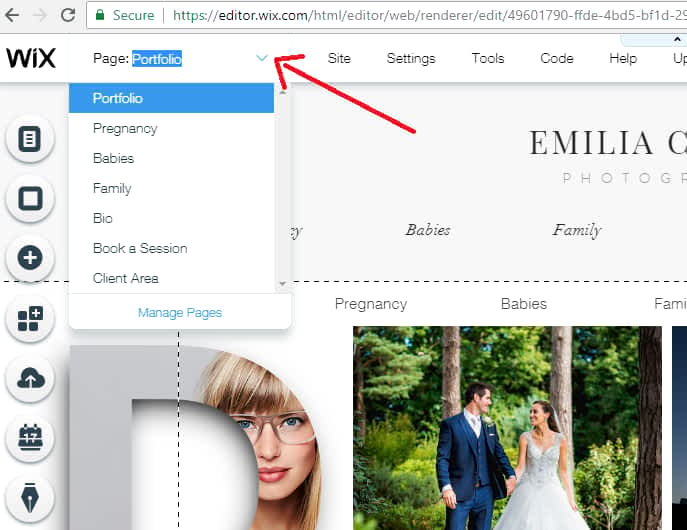
To add more pages or edit different pages, go to top the menu and navigate to the page you want to edit.
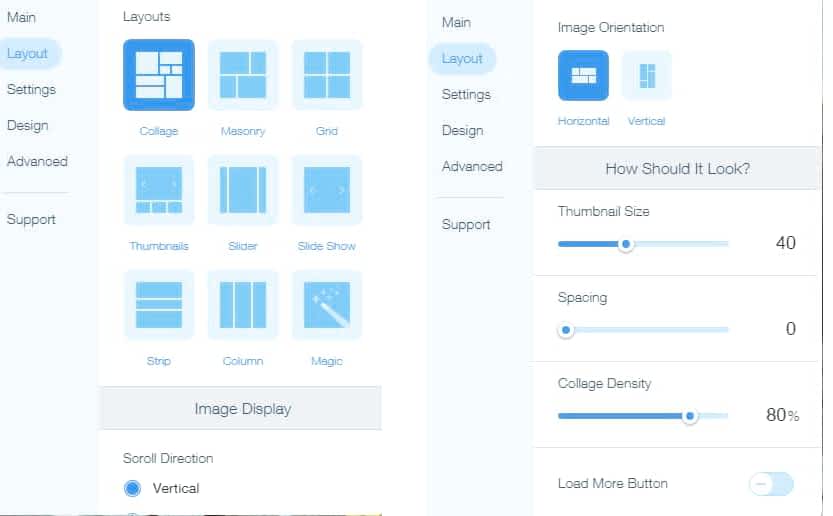
3. Upload Your Photos, Manage And Customize The Gallery
You get a lot of gallery-related options on the site editor.
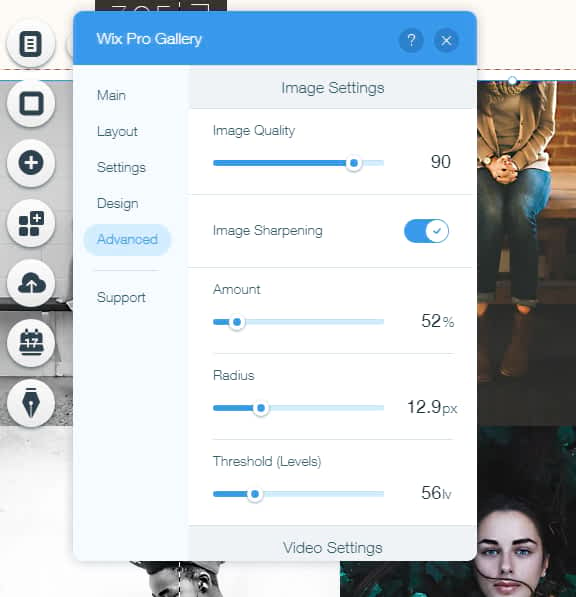
There are many media and gallery settings that give you more control over your photos.
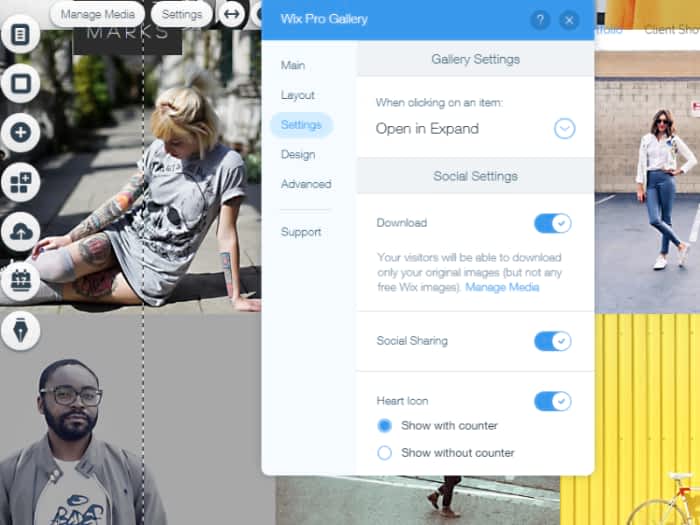
Layout settings make your website look exactly how you want it.
First, publish your website and get a domain name. Only then add apps and do more things as sometimes Google will index your photos and apps and if you do this before getting your domain, the web addresses of the photos and apps will change, impacting badly on your website. I highly recommend you get a domain name within 1 or 2 days of publishing your website. Otherwise, when you want to upgrade & get a domain, you may face some problems. It is not a Wix problem, but Google and other search engine work like that.
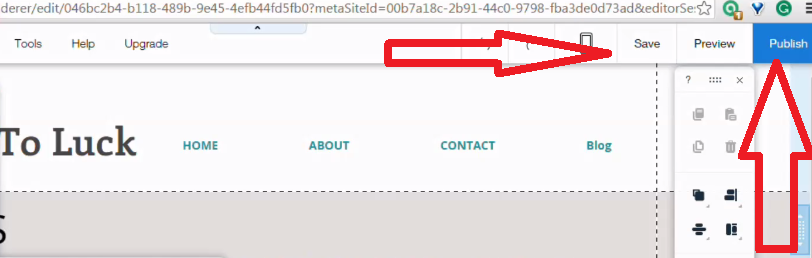
4. First Publish Your Photography Website, Then Do More Things
Once you create something on your web page, you should either save or publish your site. Otherwise, you will lose your work!
Publish means to make your site publicly accessible. No one will see your website at the beginning. Google always indexes slowly for newer sites.
- It takes at least 1 week for your website to appear on Google if you buy a premium domain (Wix offer free) , if not, then Google never indexes.
- If your website is shared by lots of people and linked on multiple sites like news channels or any trusted website, Google gives more importance to your website pages as it is seen as having valuable content.
- Remember, Google considers website age and takes some time to give a higher index to your site. So, publish your website first.
Google always indexes slowly to avoid spam or untrustworthy websites.
Click the Publish button that is in the top right corner shown below with red arrows.
Once you have clicked on the Publish button, you will see this box.
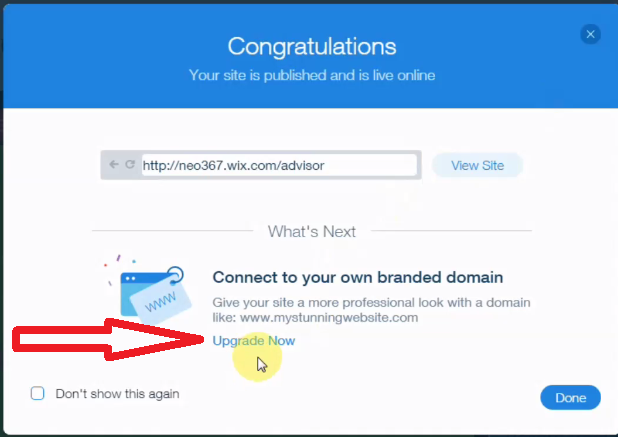
Click Upgrade Now, indicated above with a red arrow.
Once you have clicked on Upgrade Now Link, you will see this page.
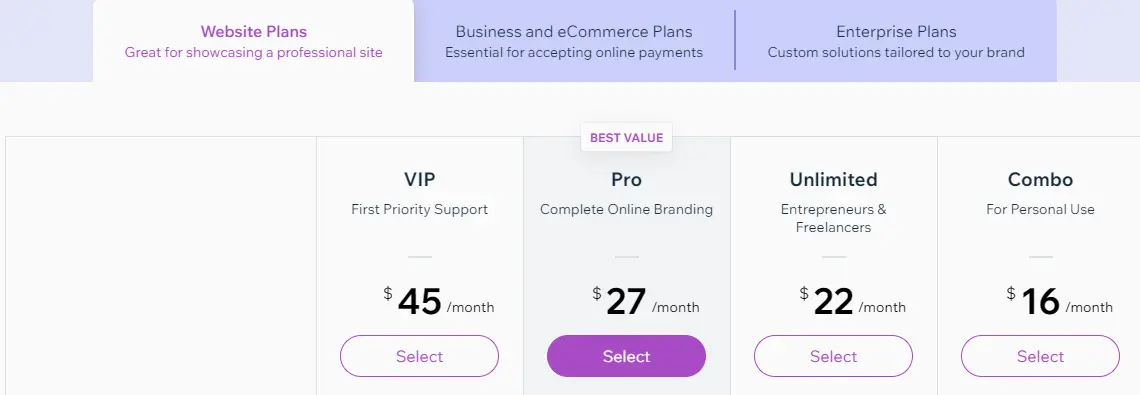
I recommend you buy the Unlimited plan.
If you want to know more about Wix plans, then see Wix Pricing – How To Avoid Wrong Plan & App Combinations? (Save 40% Every Year!)
Click on buy now. Fill in your card details.
Click Submit purchase to get your hosting. You can enter Promo code “TAKE10” to get 10% off. This code will be for all plans except the Combo, the first plan.

Once you submitted your purchase, you will get all the information to your email (the email that you used to create your account at the start).
Read your email twice. Click the link that is given in the email.
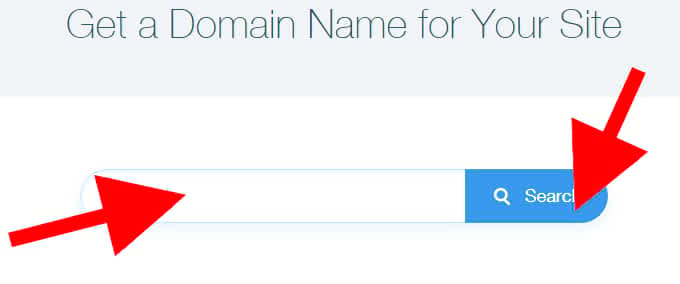
5. Get a Domain Name
Next, you will see to get your domain name for completely FREE (usually, a domain name costs around $12-$15/year).

Once you have clicked on “Buy a New Domain”, you will see a search bar.
There you just type whatever name you want to give your website.
Most of the time, you may see the domain name is not available, because someone has already registered that domain name.
Domain name is your website home page URL or your website address. Example:- www.google.com, www.selenagomez.com, ducktoluck.com, websitebuilderly.com. Don’t limit yourself to take .com only. There are many wonderful domain extensions available other than .com. E.g www.gatesfoundation.org, www.harvard.edu, www.Google.uk, www.Dekora.fashion, www.Bse.london, www.Toureiffel.paris, abc.xyz, www.yoursite.club, www.brians.photography etc.
See below screenshot for an example of an unavailable domain name
I wanted www.jackiesphotography.com as the photography website name.
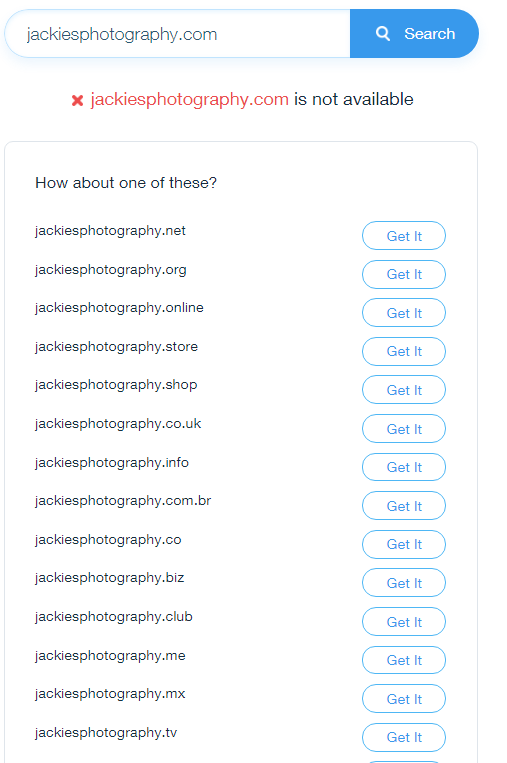
But .com was not available as someone had already registered it. However jackiesphotography.tv or.org and many other extensions were available. Instead of .com, I then tried .photography.
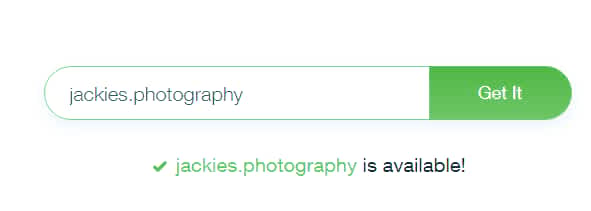
Yes. That domain name was available & I could register it.
If you really want a .com domain name, then just try with different words or add something to it.
For example
Get it and share that address with your friends.
6. Create a Photography Portfolio
You can use Wix Pro Gallery app for your portfolio.
You can link to every portfolio with a separate link and you can insert comments, share, love, like and more.
You can add 3D galleries, amazing photography enhancing stuff and more.
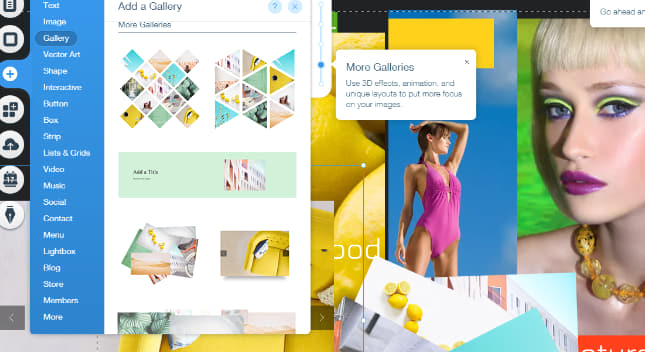
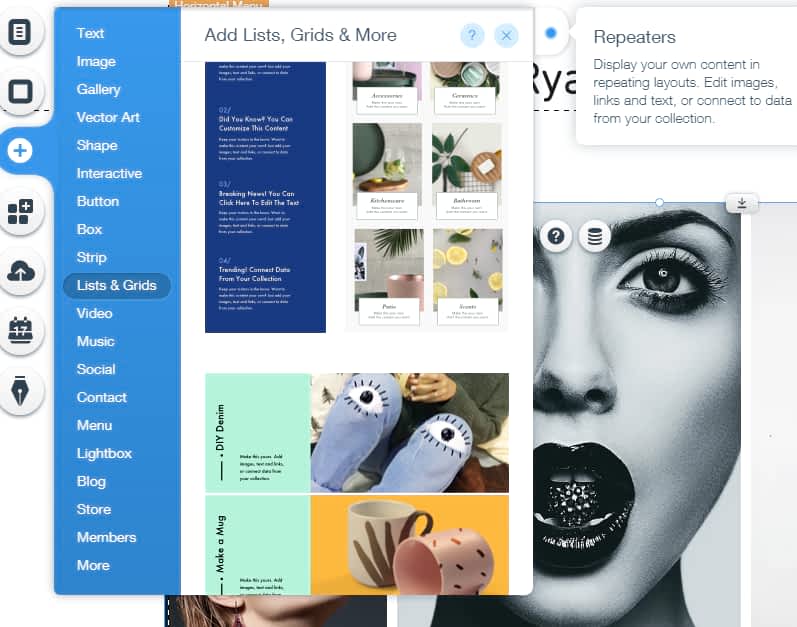
You can also use list element as a portfolio
You can use your own creativity to make the portfolio look amazing and Wix gives you full freedom.
Try Wix Photography For Free Now!
7. Create a Photography blog
You can create a photography blog on the same website. Create a separate page and name it blog. Insert the blog element there.
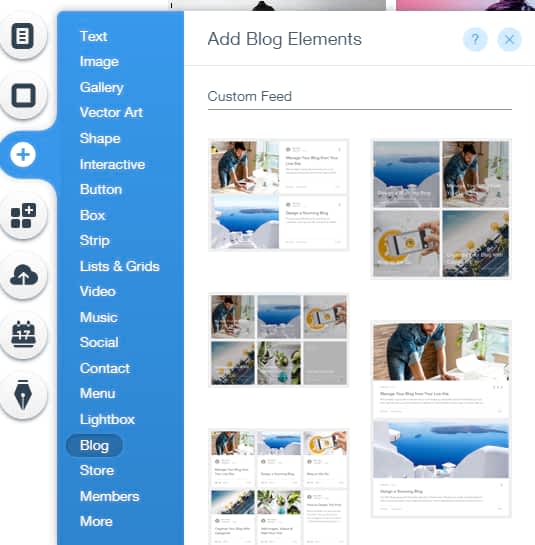
You can create a separate category like fashion photography, wildlife photography, wedding, pregnancy, baby photography etc. You can tag similar posts.
You can use different layouts and templates for blogs. Many blog element templates are optimized for photography.
Now start to write your blogs.
You can insert your blogs anywhere with a specific category or recent post only or your selected posts only.
If your blogs start to get traffic, you can apply for Google Adsense or Media.net, Yahoo! Bing Network Contextual Ads or any other ads.
Once Google Adsense is approved from Google, then you don’t need to worry about its codes to integrate the ads. There is a Google Adsense app available on Wix app store and it is completely FREE forever. You can add it in one click.

Once you add your ads to your website, you can start to make money.
Delete unnecessary pages or add new pages or hide pages from the menu using site menu settings.
8. Add Photography Related Apps For More Functionalities.
The real power of Wix photography comes from its app store. Surprisingly most of the apps are FREE!
Wix included a lot of photography-related apps.
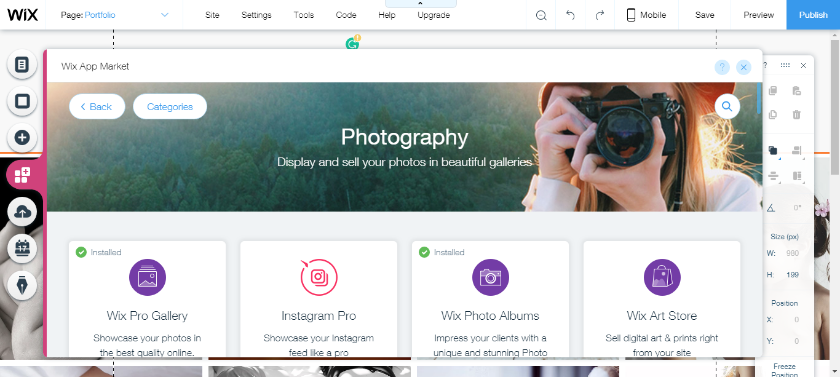
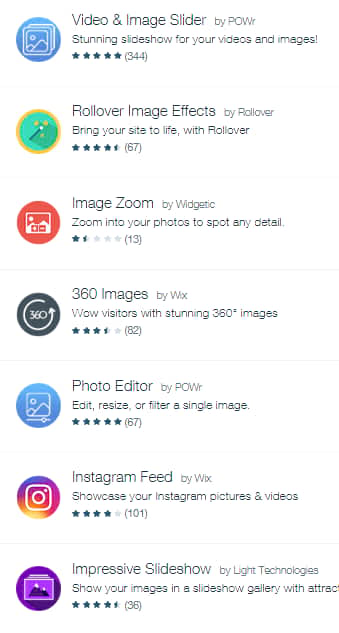
You can use those apps without any experience & they are FREE. While you are editing, it gives you 1-minute videos. So you no need outside tutorials. Here some more image related app examples.
Tip:- You can use Google drive as external storage for your images using Wix Dropbox app
Tip 2 – Insert your Instagram feed on your website. For example, see Photographer Nikollette’s site – www.nikokusz.hu (she also created her website using Wix Photography)
If you need 1000’s of GB of storage, then don’t worry. Wix offers you many options like third-party storage and seamless connection. Just create a Dropbox account. There you will get unlimited storage on the scale of TB. Upload to Dropbox, then you can sign or show your Dropbox images on your Wix website & use it just like the normal photos you upload..! Whenever you upload to Dropbox, it will automatically be available on your Wix photo folder..! You can use those photos anywhere.
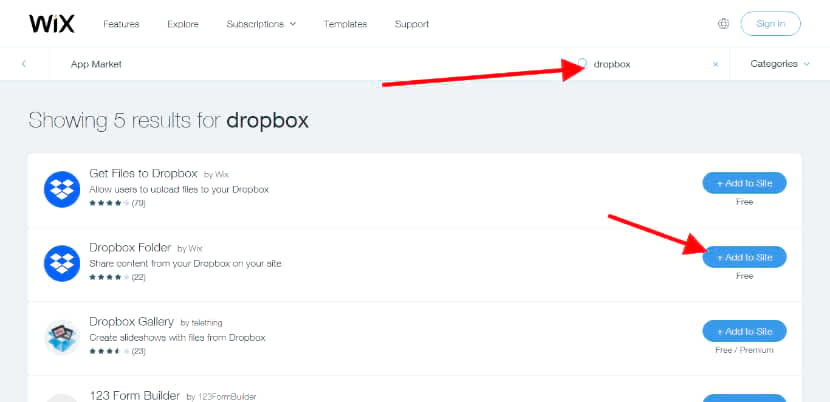
After connecting your Dropbox, it will auto-sign. You can delete the app at any time.
Now you just created a general or typical photography website. Usually, most photographers create a homepage, contact information, portfolio or client testimonials. Now you can do those things. However, if you want more advanced options like a client membership account with eCommerce features or payment system, marketing automation, then continue to read. Otherwise, stop reading & get started on creating your website
9. Create The Ultimate Photography Website Including Online Store & Automated Print Photo On Things Delivery
Let’s make your website highly professional. The steps are given below.
1. The client will book a session
2. You shoot a lot of photos
3. Then you create a page or album for them with password protection
4. You send a message to your clients with their album web address with password
5. Your clients go home and start to view all photos and discuss (you can watermark photo)
6. Next, they order digital photos, physical prints, photo frames, mug prints, shirt photo prints or any clothing prints on your website. Once they order, the watermark will disappear
7. In case you don’t have a photo frame or print on things like mugs or clothes, then Wix will do it automatically for you using third-party print-on-demand services
8. Delivery Is automatic. You don’t need to take care of it…! The Wix connected print on-demand company will do the delivery. You get the payment minus the original cost of those printed goods
9. You can also sell your artwork or any physical or digital goods or services including recurring payment services
Here is an example screenshot.
Step by step Guide. Let’s begin to make that system.
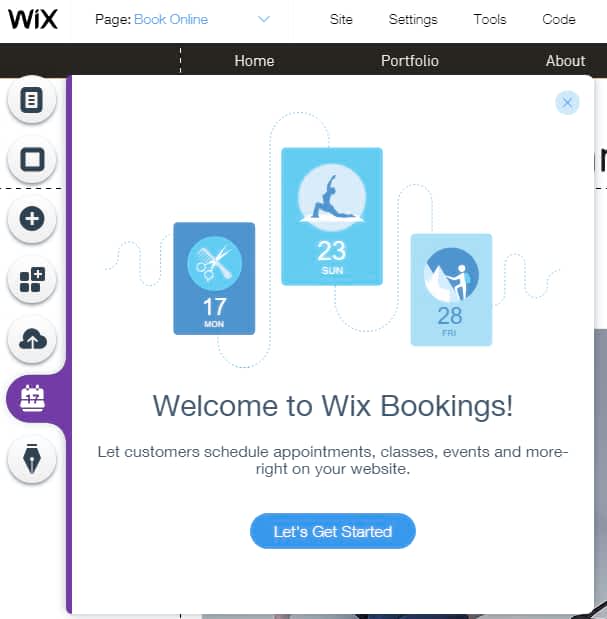
1. The client will book a session on your website. The booking system is not required if you prefer to take orders via email or phone. Tip: You can set up multiple booking allowed at the same time/session by adding more staff, hence you don’t miss any orders even for time slots that are already booked. So, during busy periods, get your friends to help to shoot and do more business.
Use Wix Booking app and integrate on your website in a few clicks. They can book with information like date, time duration, location, services etc.
Remember, the booking system and the below steps are NOT related. If you don’t like the booking system, then just add your contact information & receive orders via email or phone. Then follow the steps below.
2. You meet your clients and shoot a lot of photos
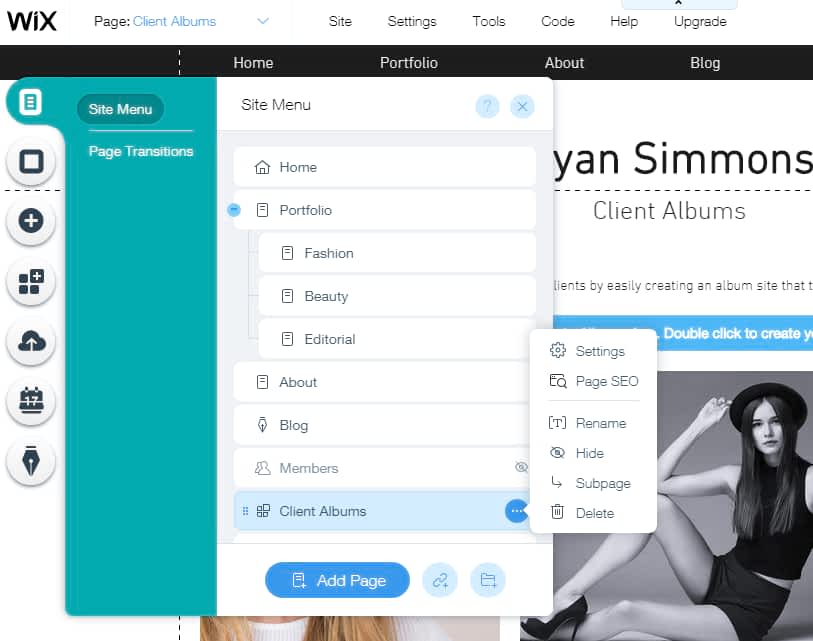
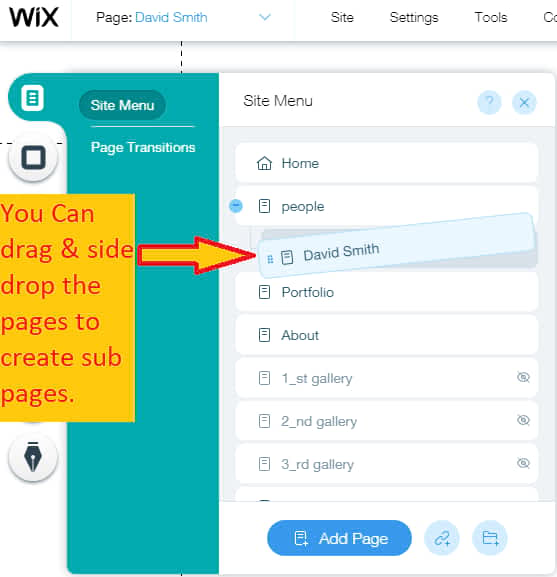
3. Then go to your website and create a new page. Name it as your customer name.
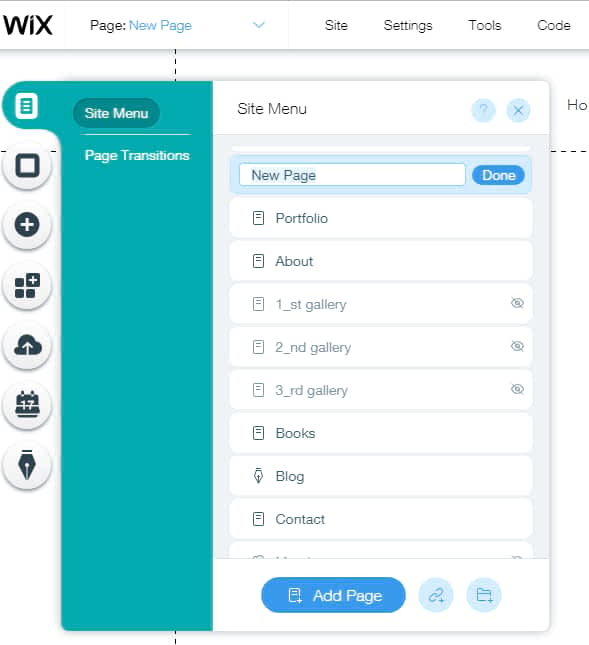
Or you can make the main page & name it “people”. Then under that page create your client’s pages.
You can drag and drop the pages to change the position or drag right side to make subpages under a page.
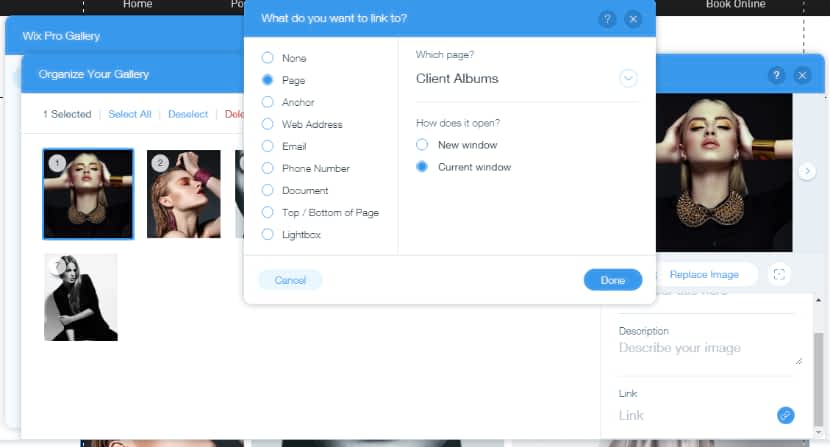
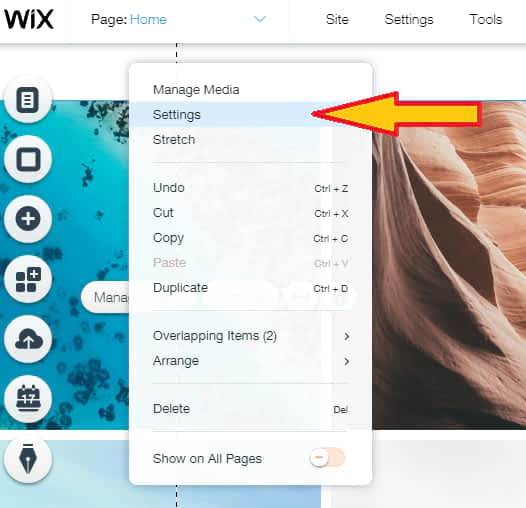
Next, click on the 3 dots. You will see different page options. Click Settings.
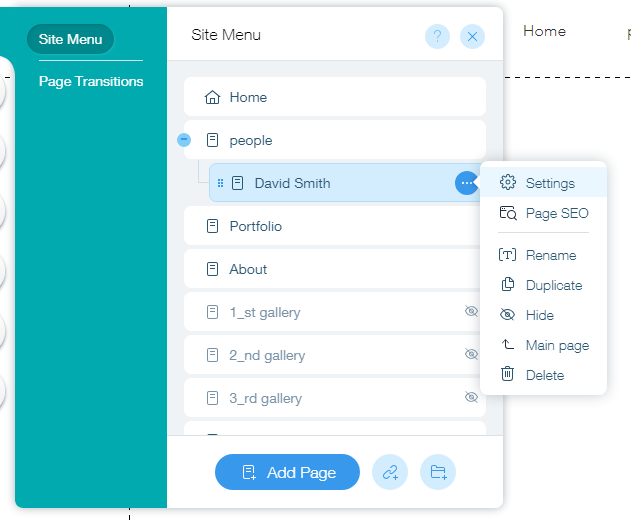
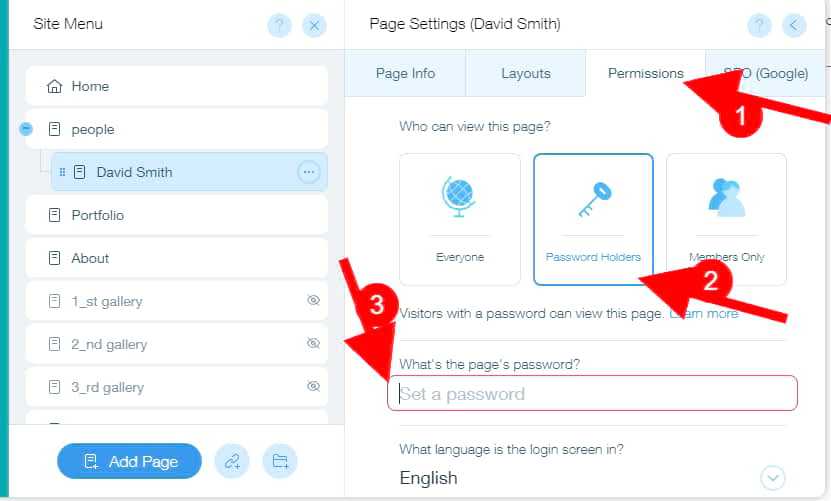
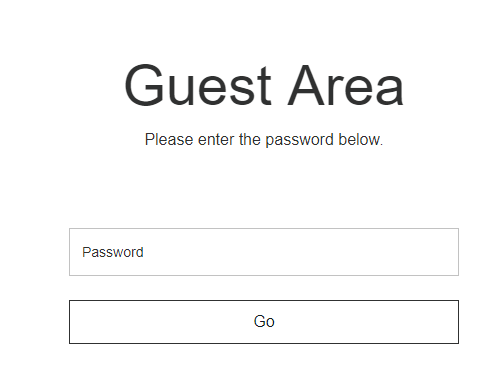
Once you have clicked on the setting option, you will see this box. Go to permission. Click Password holders. Then set any password you want. After, click Publish (located in the top right corner).
Next, go to SEO, Scroll down & see URL.
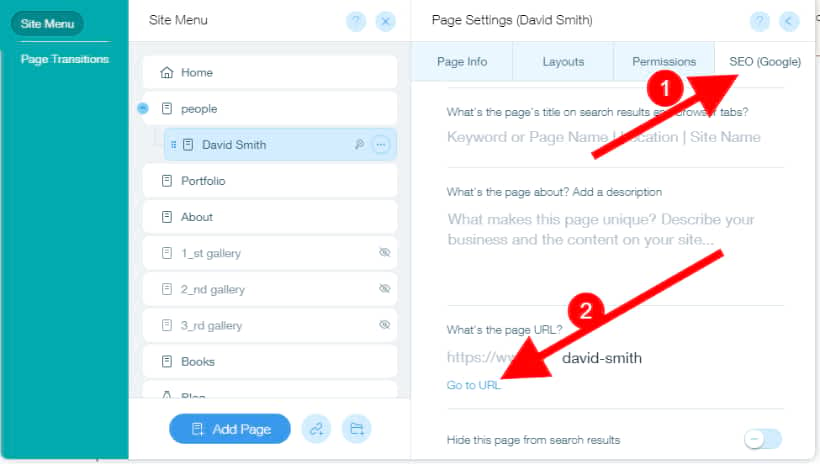
Right Click on “Got To URL”, & copy link address
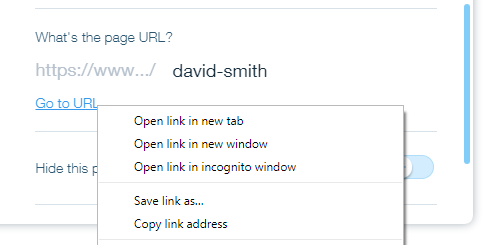
When you have clicked on copy link address, the page web address will get copied.
Save the information on any a file.
For example
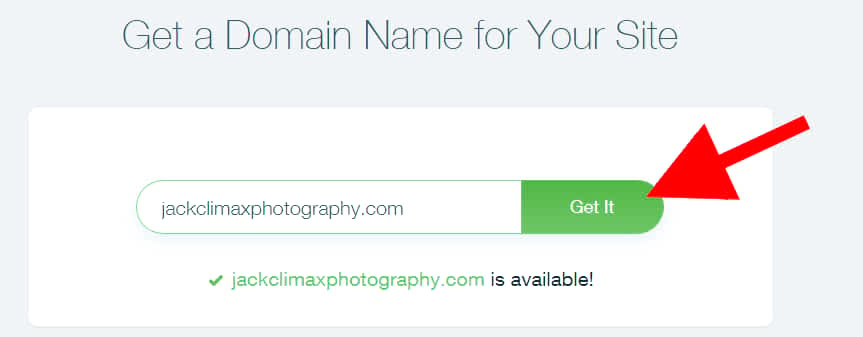
URL – https://www.jackclimaxphotography.com/david-smith/
Password – ds20
But don’t send this information to your clients now as you need to insert the art store on that page.
Insert The Art Store
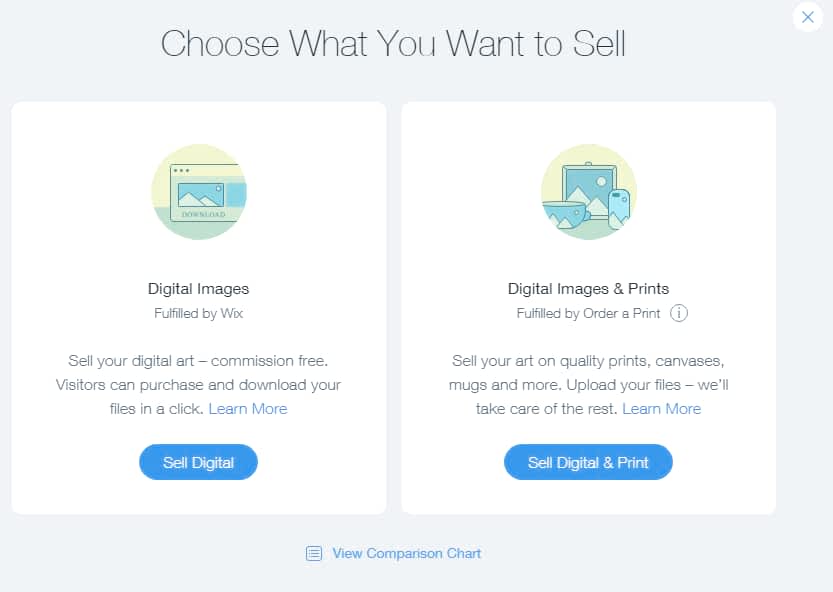
Go to Wix app store & search “Wix art store” You will see Wix Art Store by Wix. Click Add to site. It will add to the page you opened.

Next, you will see the art store on the page. You can drag and drop to change the position like Up & down or use side corner to increase or decrease the size.
Right-click on the art store and you will see all the options. Click Settings
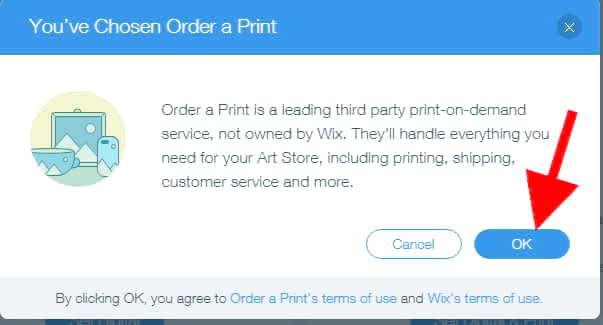
Next you will see “Choose what you want to sell”. Click Digital & Print.
Next Click Ok
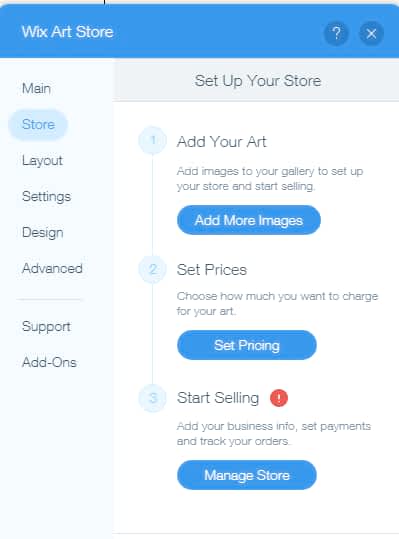
Next, you will see the art store set up. Add more images.
Next, Delete the sample images. Upload your client’s images. After, click done. The done button is on the bottom, so you may not see it unless you scroll down. Press F11 to make it full screen to allow you to see the done button.
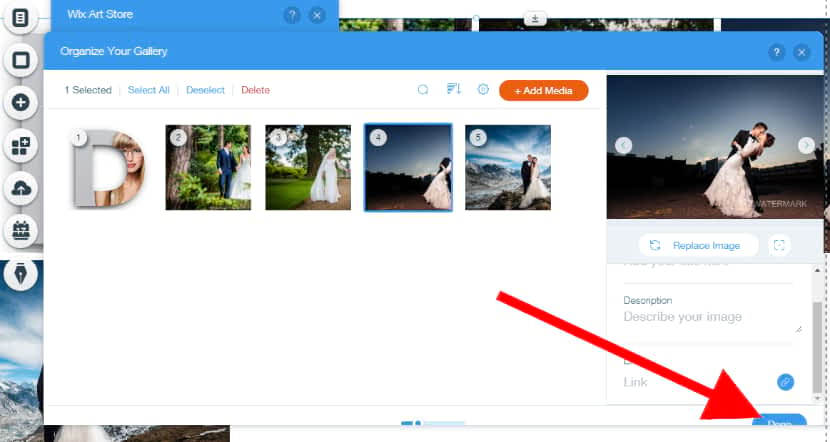
Press F11 to make full screen. Then the done button will appear (In case you are using small screen up to 15.6-inch screen)
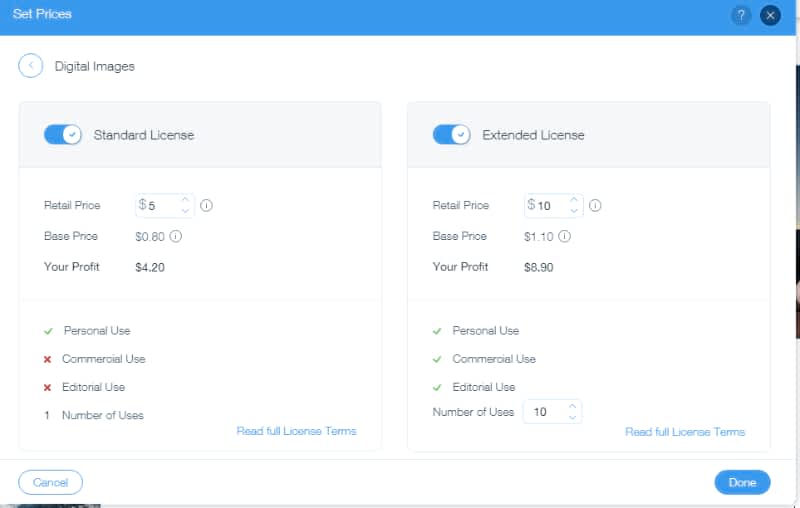
Next click Set prices.
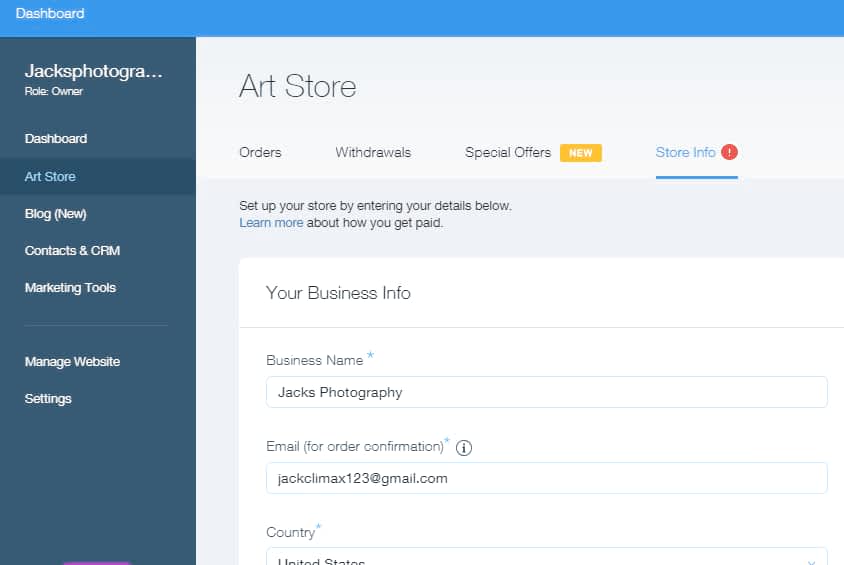
See Start Selling option -> Click Manage Store. You will see your store info fields. Fill out.
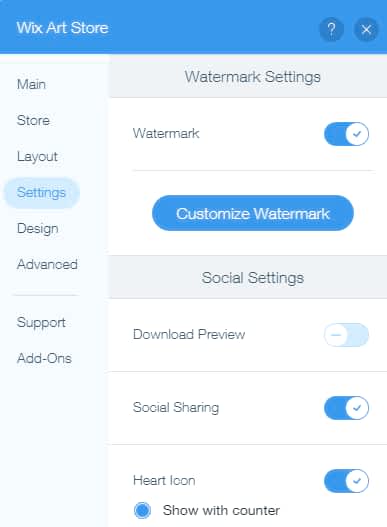
Set up a watermark with your studio name.
4. You send a message to your clients with their page URL & password.
That is
URL – https://www.jackclimaxphotography.com/david-smith/
Password – ds20
When they go to the page URL, this password box will appear. If they enter the password that you have given to them, then only the pages with their photos will appear.
5. Your clients go home, start to view all photos and discuss.

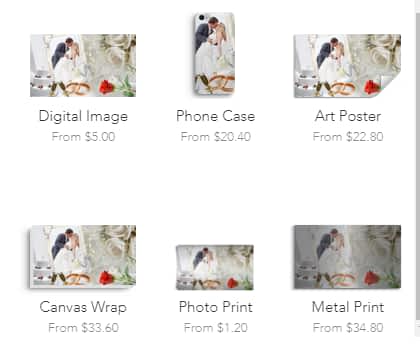
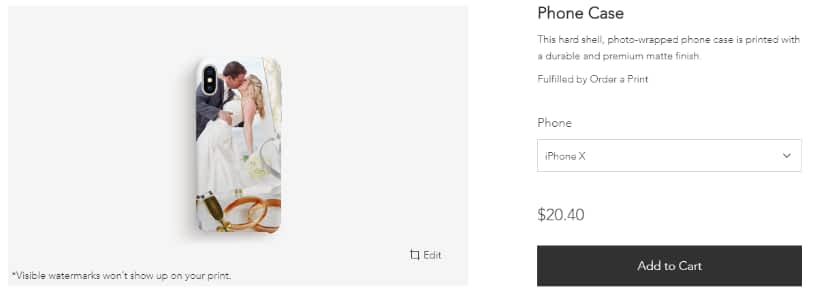
6. Next, they order photos, prints, photo frames, phone cases, art posters, canvas wraps, metal prints, mug prints, shirt or any clothing prints on your website. They can see different frames, prices & everything. They can order again whenever they want without wasting your time as well as theirs (The download or right click is disabled & your studio’s watermark mark will appear on all photos, so they can’t take a screenshot. But when they order, the watermark will automatically disappear).
Wait… what if you don’t have phone case print, metal print, cloth print like services/products?
Don’t worry, Wix will do it automatically for you using third-party service Print on-demand services. …!!!
You can set your own prices. When your client orders, the order will go to both you and print on demand. But your customer thinks you are giving that service and the third party company name is never revealed.
(You can track everything. In case they don’t deliver, Wix will take immediate action. The quality is good enough to satisfy your customers. I have bought and tested all the samples. Wix made deals with the best services, so you don’t need to think more about the quality.)
For example, if they order a phone case, then automatically the Wix-connected third party will create the phone case of your client’s photo (as you already uploaded on your website and they get the photo from the order.) They will deliver on behalf of your studio..! You don’t need to worry about anything.
The payments are secure.
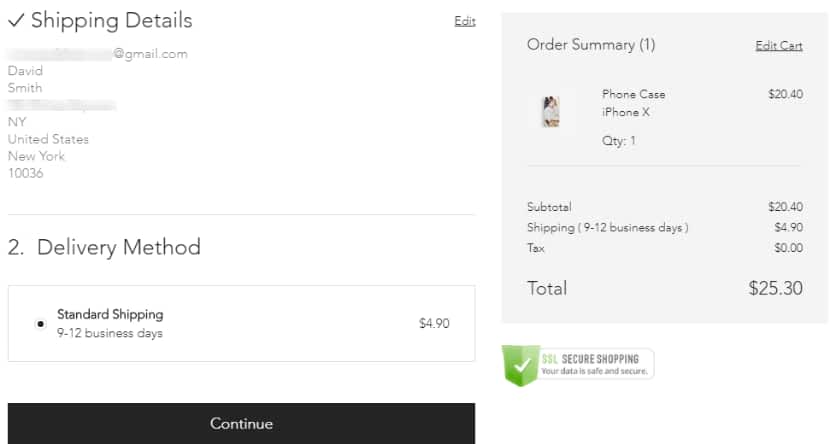
Note: Shipping charge is included in $25.30 (it is not extra).
7. If you have a photo frame or print on things like mugs or cloth-like services, then you can start your own store on the same website using the Wix store app.
8. You get the total amount of the product minus the original cost of those print items.

9. You can also sell your artwork or any physical or digital goods or services including recurring payment services.
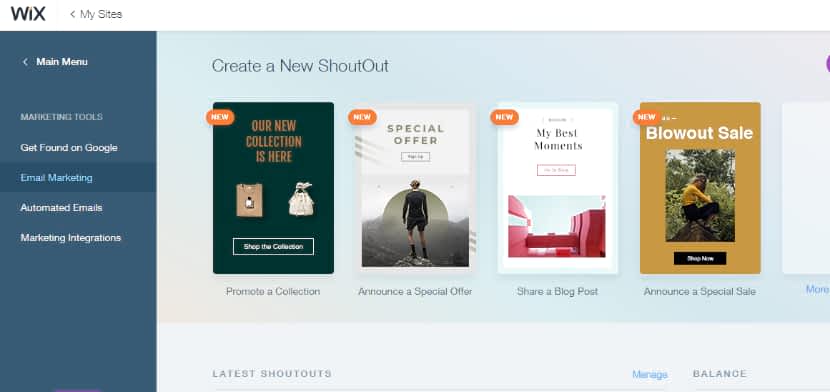
Start Email Marketing & Increase Sales
You can use Wix shoutout email marketing tool to reach your clients or give them offers, new updates, monthly reviews or your company milestones etc.
Email marketing automation is easy, so within a few clicks you can start online marketing. There are 100’s of ready made fully optimized email templates available for free. Just edit your company name and send it or automate it..!
If you follow these steps, website will become one of the best professional photography websites in the world. Printing photos on things is very new so most photographers don’t know how easy this is.
Yup..! You just created your own highly professional photography website…! You can share it with your friends and clients. Start to kick off your photography business. If this tutorial helped you, then please comment below with your website name. So that I can have the pleasure of knowing that my tutorial is really helping people.
The first method Wix Photography is recommended for photographers as it is quick and easy. It’s also affordable. But if you want advanced control over your website and are prepared to spend at least 10 days learning, or want to become a professional web designer, then go for the 2nd method WordPress below.
Method 2: How To Make a Photography Website Using WordPress?
Jack is the Co-founder of WebsitebuilderLy, a Software Engineer from Standford University, An entrepreneur with 12 years of Website Creation, Management, Marketing Automation & App Development Experience. Worked for the world’s leading companies such as Roblox, HTC, etc.


")

")

")

")
Building a photography website to showcase my portfolio, I got inspired to find curvy women on a specific dating site. Searched for niche platforms and found https://www.nastyhookups.com/big-boob-dating.html . It’s fun, with lots of active members and a simple interface. You can send flirts, use detailed search options, or join forums to chat. The site’s secure, and there’s a mobile app. Met a confident woman who shares my vibe.
This is a really informative post.
Thank you for your feedback. You made my day.
Thank you for the great post. As a photographer, I was struggling to change my website. Every time I needed to contact web designer and paying costly dollars. This guide saved me. Now I am able to set up not just a photography site, but also a photography store. Thank you so much.
Your comment made my day. Thank you.
If you need any help, you can take from us.
I just want to say thanks for your wonderful post…
Thank you for this wonderful & helpful post.
Very informative post,really liked this post… Thanks for sharing.
Thanks for sharing such a informative content.
Great post!! Thank you very much for sharing.
Such A Nice Post, Keep Up The Fantastic Work..
The guidelines are really helpful for any photographers to design their photography website.
Thanks a lot.