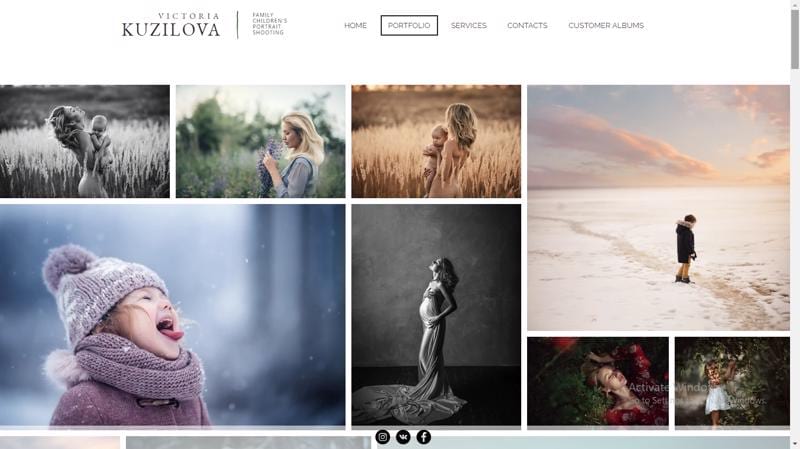
Do you want to make your photography website like this screenshot below?
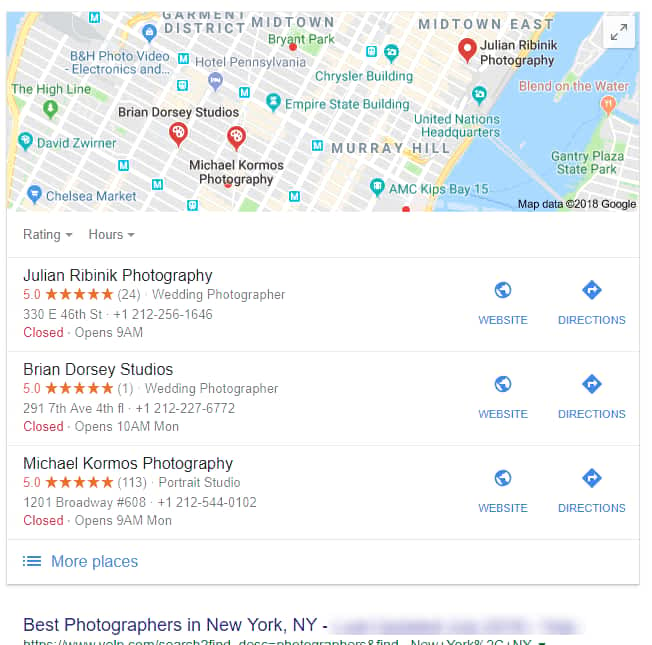
Do you want to make a photography website for your local business and get on Google like this?
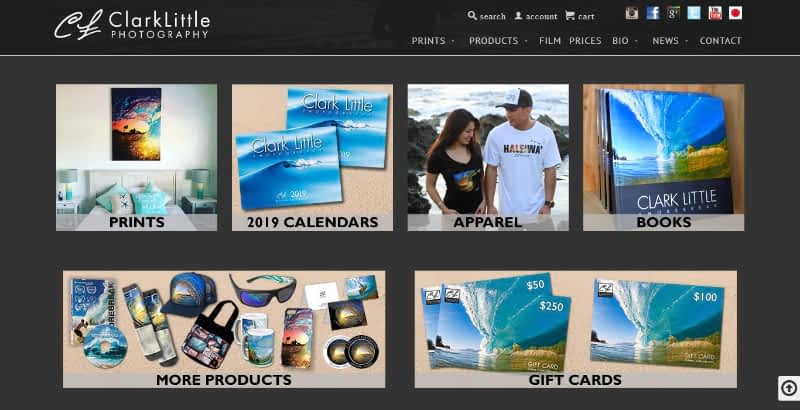
Do you want to make a highly professional & complex Photography website with eCommerce features?
You can do it within an hour with no skill using WordPress!!
[Note: – WordPress is a little difficult. If you want the best & easiest method then click here – How To Make A Photography Website, Web Portfolio, Photo Blog, Art Store, Sell Your Photo Print In USA as well as World-Wide With Automated Deliveries & Everything In 2022 (2 Hours & No Skill Required)]Using WordPress (NOT WordPress.com)
How To Make A Photography Website, Portfolio, Photo Blog, Art Store & Everything In 2022 Using WordPress?
It is NOT WordPress.com. Never Ever Go For It. (Don’t Confuse, Just click the link given there) Because WordPress.com included only 100+ themes & 50+ plugins. But the Open Source Self Hosted WordPress (WordPress on Bluehost) included 70,000+ Plugins..! For FREE!, 60,000+ Themes..! For FREE!
(This Is 60% OFF Link)
Why WordPress For Your Photography Website?
Because
- You can create almost any type of website in a day as your needs and dreams.
- 39% of all websites in the world are created using WordPress..! You can use WordPress as a CMS & Site builder at the same time by installing Elementor for free..!. So WordPress is the King of website creation platforms.
- You can get tons of amazing things on WordPress Marketplaces
- It is easy to use & included a lot of photography functions than any other website builder in the world.
- + Plugins, + Themes..! + Uncountable Millions of plugin/templates/themes/apps from third party market place + Growing..!& more functions with huge free support tutorials, forums, FAQ’s.
- There are so many free photography themes available. You can change the template without losing your work. The template sets & fits your content and everything automatically.
- Not just WordPress directory, Outside also You can find lots of photography themes & tons of photographers related items on ThemeForest
- You Can Turn WordPress Into Drag & Drop Website Builder More Powerful Than Wix In 5 Minutes..! (How? – I explained below )
- If you need more storage or web hosting, you can upgrade at any time. there is no limitation. You can upgrade forever to cloud hosting Dedicated hosting etc. If you feel the price of the hosting is costly, then you can use external storage like Google drive. You can upload all your images directly to google drive. Then You can use google drive as external storage for your images using the Google Drive WP Media plugin & it is free with 4.2/5 star rating. So that you no need to burn your money for more web hosting.
- Even Big Brands like Microsoft News Center, Walt Disney Entire Website, Facebook Newsroom, Star War blog, Harvard Gezzet Online, & all the following entire websites were created using the WordPress – Mercedes Benz, Time INC, Tech Crunch, Bata, The New Yorker, BBC America, Sony Music, & Celebrities like Katy Perry, Justin Bieber, Beyonce, Usain Bolt, and almost all popular entire websites created using the same method..! Obcourse, This entire site WebsitebuilderLy.com is created using WordPress.
- You can get Free unlimited subdomains & business emails on SiteGround.
- SiteGround provides you free WordPress Assistant with unlimited FREE support 24X7. Live chat, Ticket system, support guides, phone, email. Siteground won the 2022 Award for its extraordinary support. SiteGround live chat has an average wait-time of only 7 seconds & its toll-free number has an average wait time of only 5 seconds
- Image SEO Included.
- If you don’t have photo frame services or printing your client’s photos on iPhone case, Canvas, Shirt or any printing on things, Then still you can give those services & make money more & fast. Just create a free account (It is forever free) on Printful, then just connect it using Woocommerce & Printful plugin. Everything is free. When your customer orders, then the order is sent to both you & Printful. Then Printful will print & deliver. You no need to worry about anything..!! But their company name will not reveal. Your client thinks you delivered the product. You get profit minus the original cost of the material & printing service.
- There are millions of Pros that I can’t list here
But WordPress has a few disadvantages also.
Cons:
- In the beginning, you may feel difficulty.
- There are a lot of plugins and themes. So you may get confused which one to choose (Tip: For every plugin, you can see all stats. Choose the one that is more downloaded, updated and with good reviews)
- In very rare cases different plugins do not match each other. (Solution is here:-In that case you just deactivate all plugins and reactivate plugins one by one. So you will know which plugin is creating the issues. Just deactivate that plugin and find the alternative to that plugin)
Okay.. Let’s see how to build a website using WordPress in an hour without knowing anything..! & almost free..!
Here is Outline:
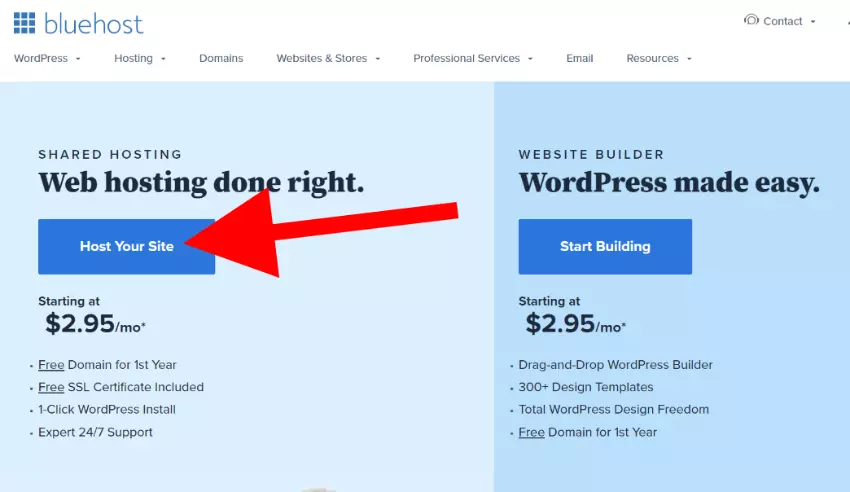
- Sign Up For a Photography Configured Hosting (Bluehost WordPress Hosting)
- Install WordPress. (One Click Is Enough..!) (5 Seconds)
- Fill Your photography Website Details. (1 Minute)
- Create photography Pages and Blogs. (2 Minutes)
- Get Drag & Drop Editor. Turning The Basic Editor Into Amazing Drag & Drop Website Builder More Powerful Than Wix. (Appx. 5 Minutes)
- Get On Google, Bing, Yahoo etc.
- Install a Photography Theme with client proofing & management.(5 Minute)
- Get Our Clever Picked 10 Best Photographer’s Plugins (20 Minutes)
- Promote, Start online marketing automation & Make Money (1 day)
Sign Up For This Photography Configured Hosting
Bluehost WordPress Hosting Is The best & affordable web hosting for photography-related sites.
Visit SiteGround- WordPress(This Is 60% OFF Link)
SiteGround Starting plan includes 10GB storage. If the storage exceeded, then you can upgrade for higher storage with a single click. 10GB is more than enough. Because everybody uploads videos on YouTube and insert it into the website. So for videos, you need Zero space. Most of the celebrities don’t upload all the photos on their website, Instead, they upload on the social media like FaceBook, Instagram, Pinterest and insert its feed on their website. It increases more likes, shares & comment on their photos. Also, you can use Google Drive WP Media plugin for free. Even you upload directly to your websites, then you can upload 1000’s of UHD photos.
Note: You don’t need too much space. 10 -20 GB space is more than enough. (Over the past 4 years I posted 100’s of tutorials & 2000+ photos directly on this site. Still, My entire site WebsitebuilderLy.com is 1.2GB including photos & everything. ..!)
Visit SiteGround- WordPress(This Is 60% OFF Link)
Go To Bluehost WordPress Hosting
Order Start-Up Plan. If you feel, your website will get more than 10,000 visits/month, then choose the middle one plan or 3rd plan. If you are a popular & your website gets lots of traffic, then you can go for the Cloud hosting. Don’t worry, you can upgrade or downgrade from any plan to any plan at any time without losing the remaining credit or money.
Note: Many web hostings give unlimited visitor/month features. But they limit other sources like RAM or CPU or any other factors. I already tested all top 20 hostings. Bluehost like hosting seems you to give more capacity, In fact, when you start to run the website, you will understand, that’s is not true. If you get more visitors, your website gets crash or billed you heavily & your site loads slower Because they use messy shared hosting. But Siteground configured with a strict hosting allotment & your site load faster than the other hosting sites until you meet the limit & they notify you before the site go down.
Once clicked on the Order button, you will see, enter your domain name field.
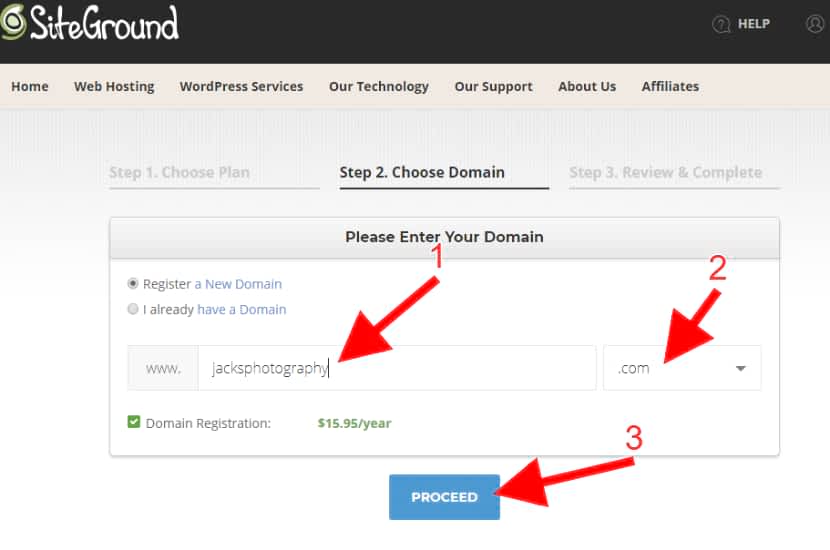
Type what name you want to give your website. This name is called the domain name or your website URL. You no need to choose .com for the last extension. In olden days, only .com .org & .net were available. That’s why most of the website ends with .com, but Nowadays 100’s of domain extensions are available like .club, .company, .agency, .photos, .photography etc. For example, you can take your website name as www.jacks.photography instead of www.jacksphotography.com.
Remember – Most of the times your typed domain name may not available. (Because someone already took that) Then it will show available domains, You can choose the best that fits your website.
Here is an example. One of my clients needed a website for his photography portfolio. He wanted JacksPhotography.com. So typed and proceeded. But the domain name was already taken by someone
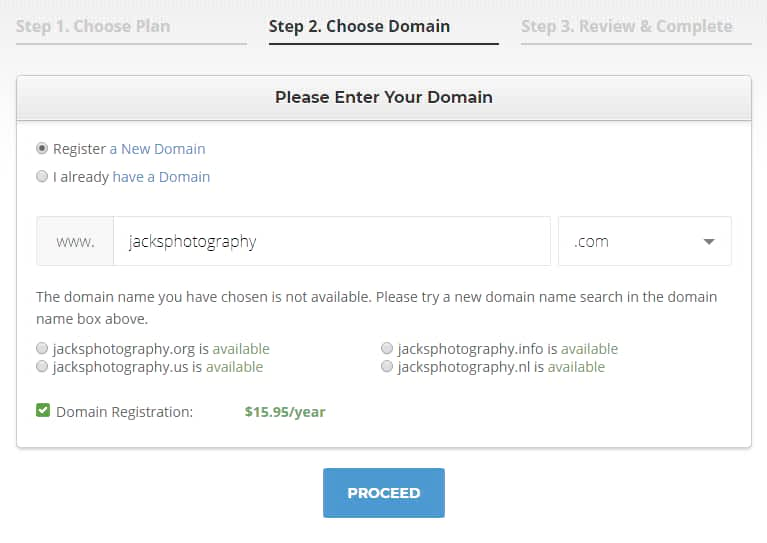
When your the domain name does not available, then try a different one. You will see some suggestions. If you don’ liked the suggestions, then click on the .com dropdown and you will see all TLDs (Top level domains)
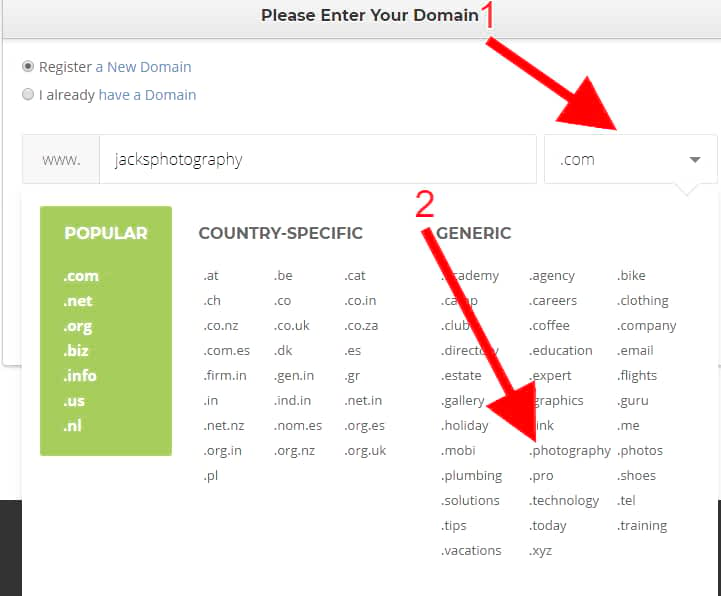
Select dot photography and proceed. (But dot photography is a little bit ($4) costlier than dot com.)
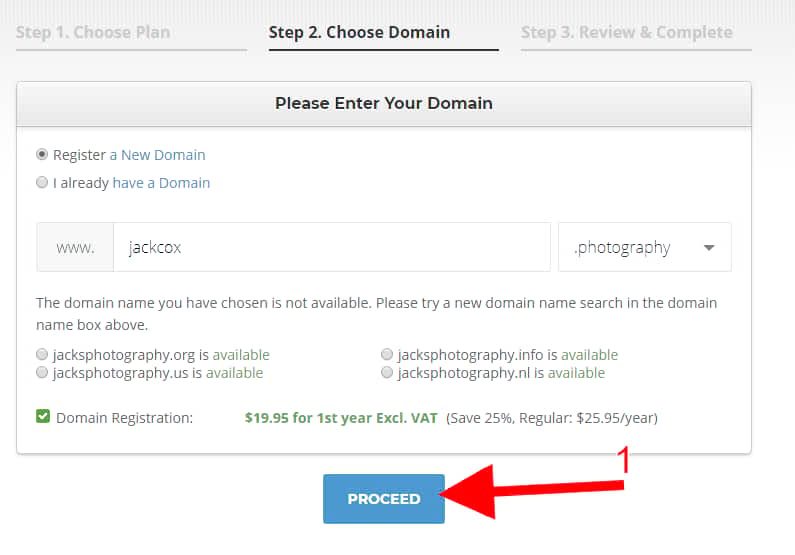
Many people prefer .com only. If you want .com then just add some words. For example, jackphotography.com is not available, So I added my client’s surname Cox also. That is jackcoxphotography.com.
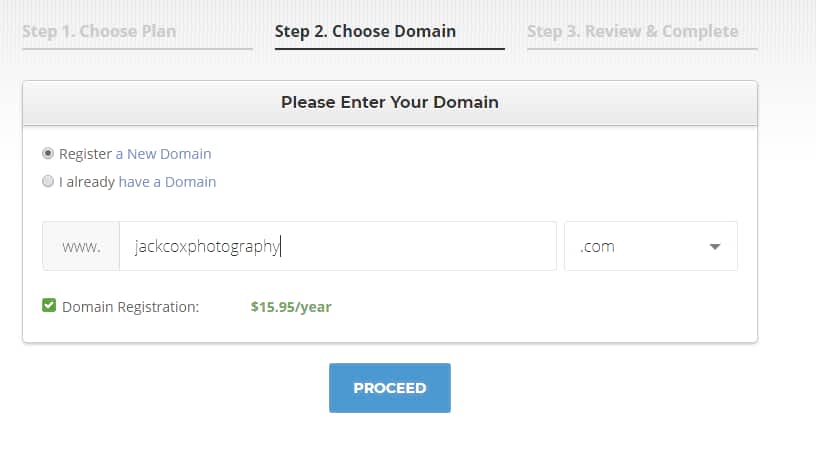
Yes, that domain name was available..!
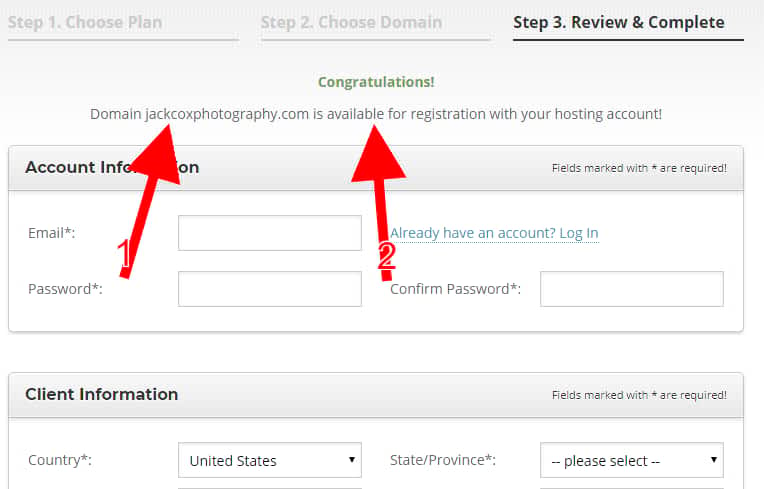
Once you find the available domain name, you will ask to fill out your information, password & billing details to register it. Once you created the password, Write it down. Because it is needed to log in & create your website.
Just deselect domain privacy & hack alert monitoring. It is unnecessary. (If you want, you can get it at any time)

Once you fill out the form, click on pay now. Once the transaction completed, it shows this message.
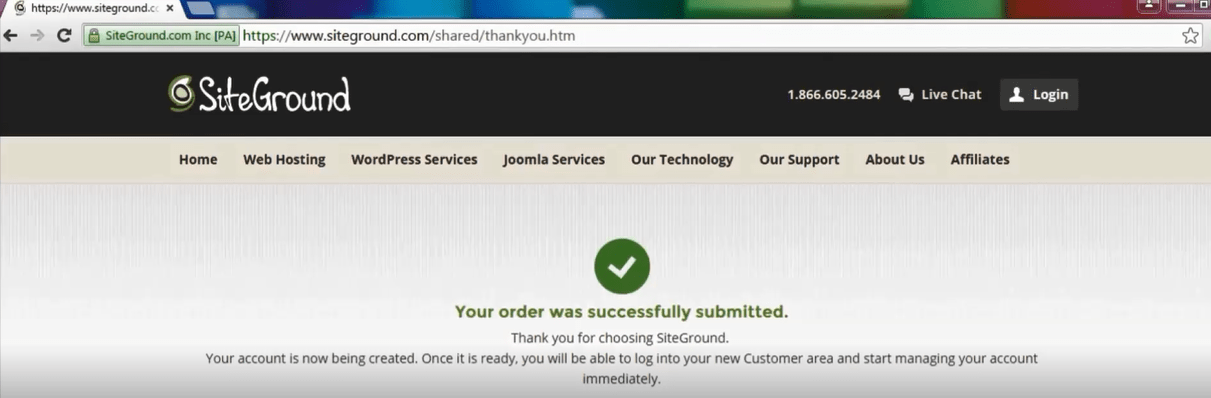
You will see the Order successfully submitted a message after you paid.
After go to your email & see order confirmation, receipt & admin login information.

You will see SiteGround Email with all details. Click login to your customer area link.
Once you clicked, you will see a login form.
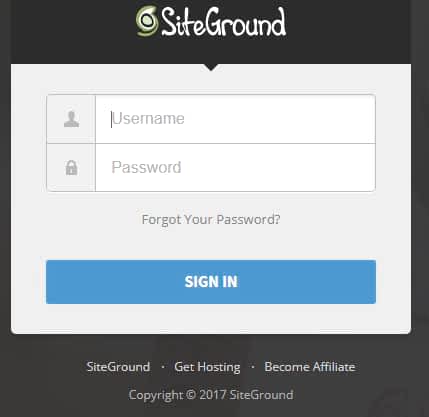
Type the username that you got on your email
Type the password that you created when you are filling in your details on submitting the payment form. Click Sign In.
If you can’t sign in, you can take SiteGround help. Because now you are SiteGround Customer..!! & you have the email proof.
2.Install WordPress
Time Required – 2 Minutes.
Once you logged in, you will see start with a new website. Select it & click Proceed. Once you click on Proceed button, you will see This page.
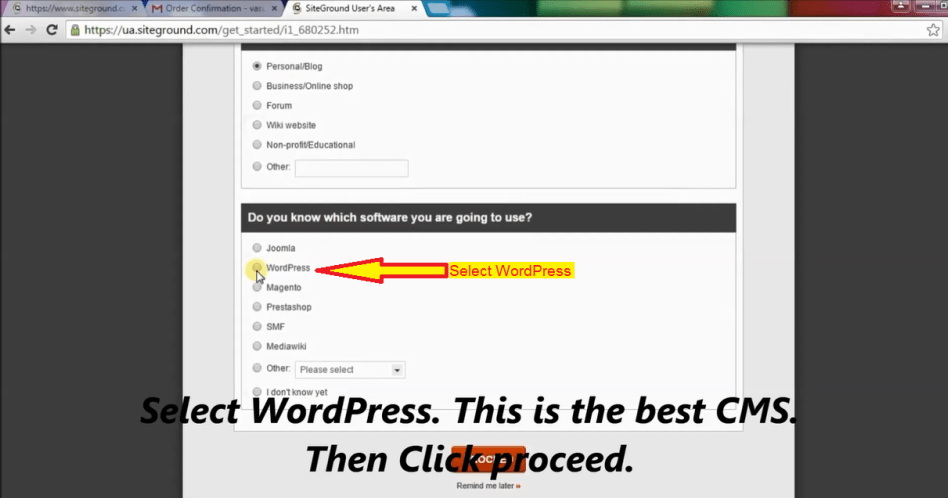
Select personal or forum or any option, It doesn’t matter. But in the second option, “Do you know which software you are going to use?”- Here you should Select WordPress. Then click proceed. You will see 10WordPress premium themes for free.
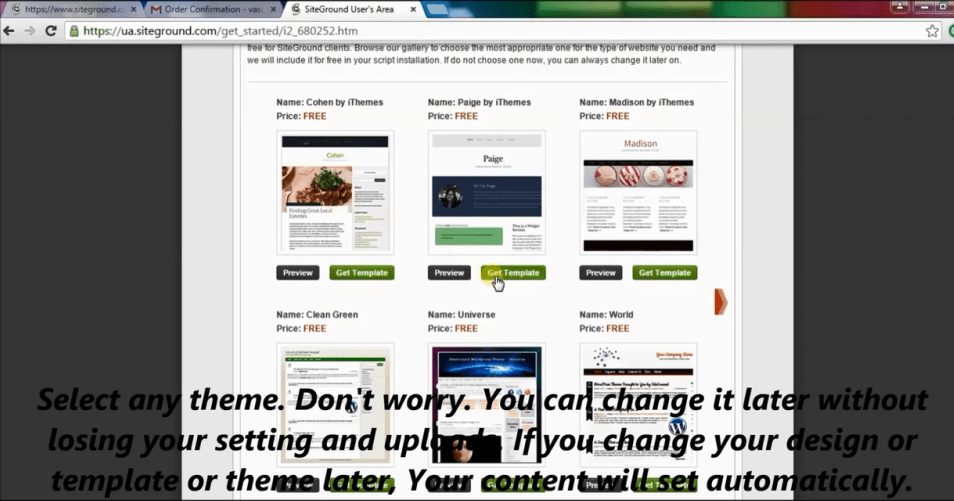
Select Any theme. Don’t worry, you can change it later at any time without losing your previous work, content & everything.
(After you can install any 50,000+ themes or templates, but at the beginning, you see only 10 themes, So that you will not get confused)
Next, you will see the WordPress admin username & password with login URL. (I hid with the dark mark)
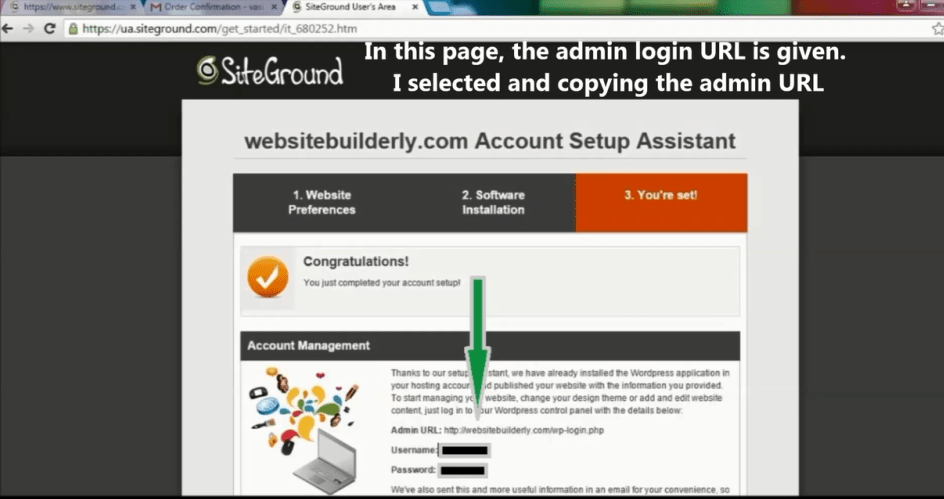
Copy the login URL & paste into your browser. Then You will see this page. Enter the username & password that you just got.
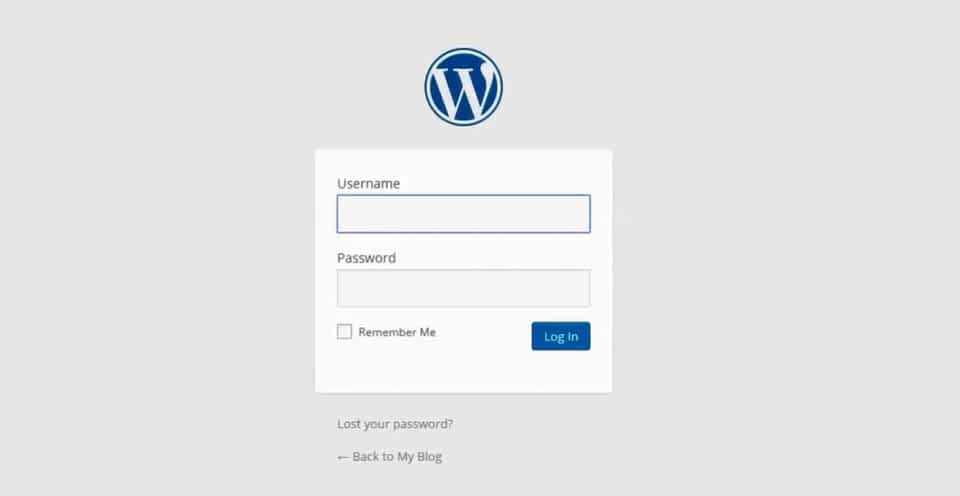
Once you log in, you will see the dashboard.
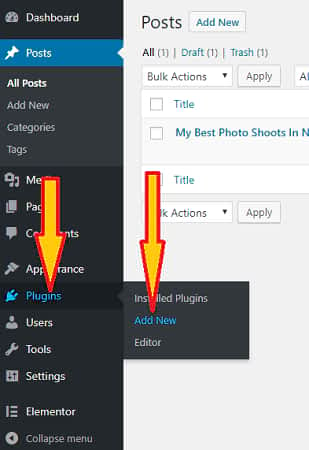
The very first thing you need to do is delete default blog post example & unnecessary pre-installed plugins.

Click plugins. Deactivate or delete plugins. Because by default unnecessary example plugins pre-installed for demo purposes Those plugins make you confuse at the beginning and load your website slow. Don’t worry. If you feel, you need deleted plugins, then anytime you can install & activate for free from the WordPress plugin repository.

Once you clicked on the delete option, browser popups & ask you “Are you sure want to delete the plugin & its data?”
Click ok

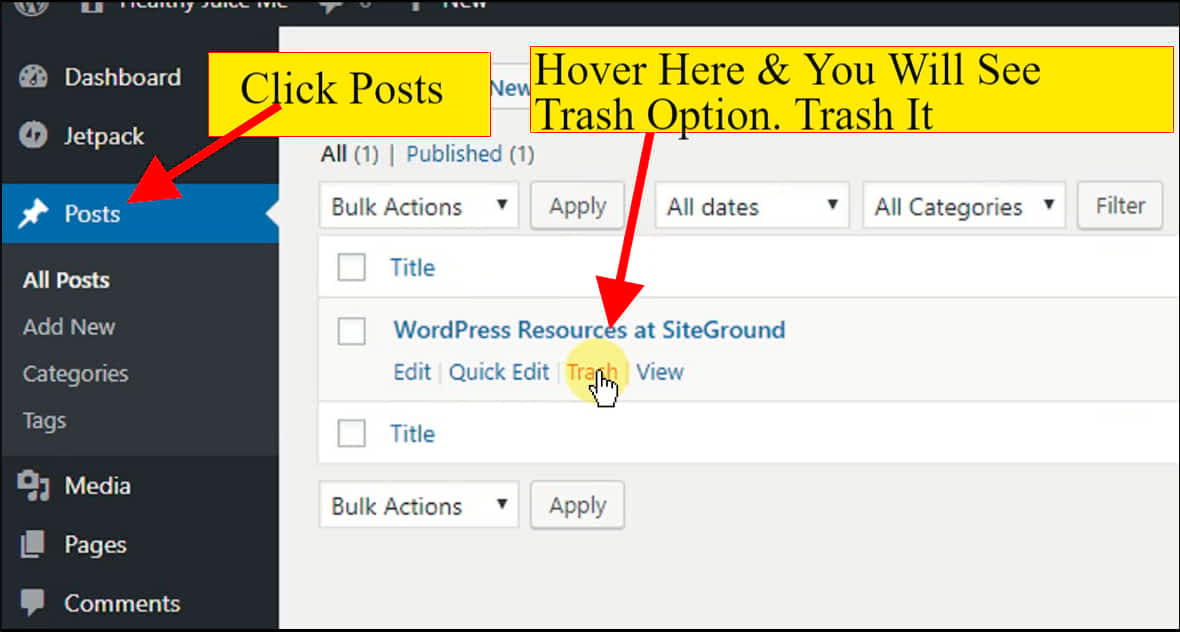
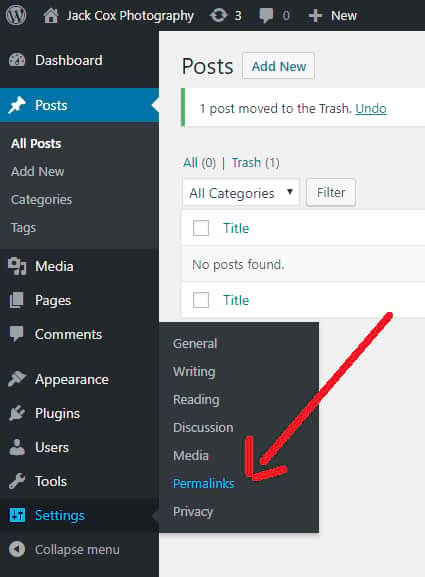
Then the very first thing you need to do is, delete the default blog post example
Go to posts menu & hover on the post already published..! SiteGround will automatically post for demo purposes. You don’t need it. They gave some resources that you can see here -> WordPress tutorials.
If you are curious, then Read & delete as soon as possible, otherwise, it will index on Google from your website. It makes the wrong presentation of your website.
Filling Your Photography Website Details
Time Required – 1 Minute.
Now Let’s Start To Build Your Website.
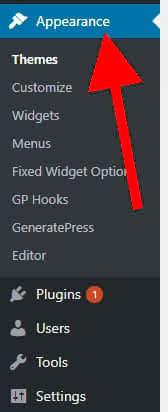
Go To Appearance – Customize
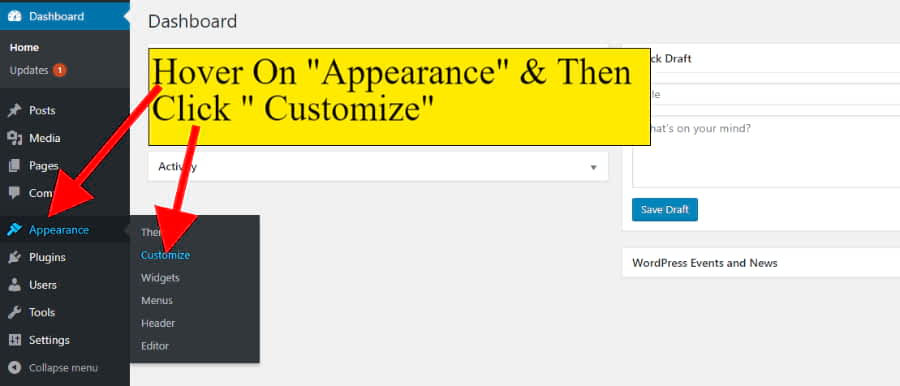
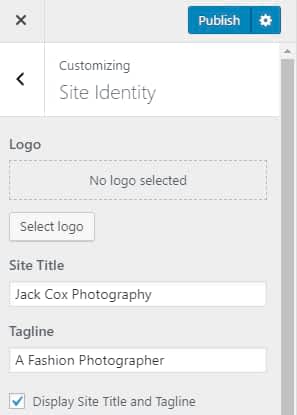
Click Site Identity
Fill your Photography site title & tagline. So that Google will show your website properly in its search results.
Create Pages & Blogs
Time Required – 3 Minutes. (Depends on how much you write).
Now I recommend publishing at least 2 blogs & pages. It may be anything. Just write you created your photography website today or any tiny topic related to your website.
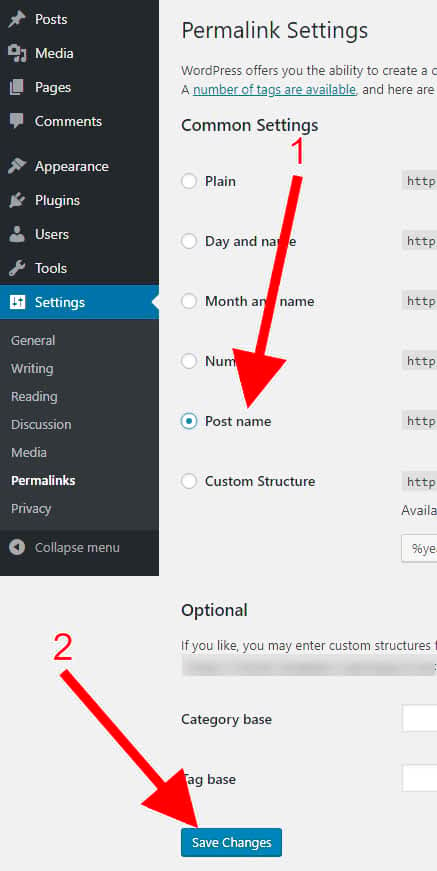
Before you post, I suggest you set post URL or web address structure as post name. So that it looks simple and easy.
Go To Setting -> Permalink
Then select Post name & Save.
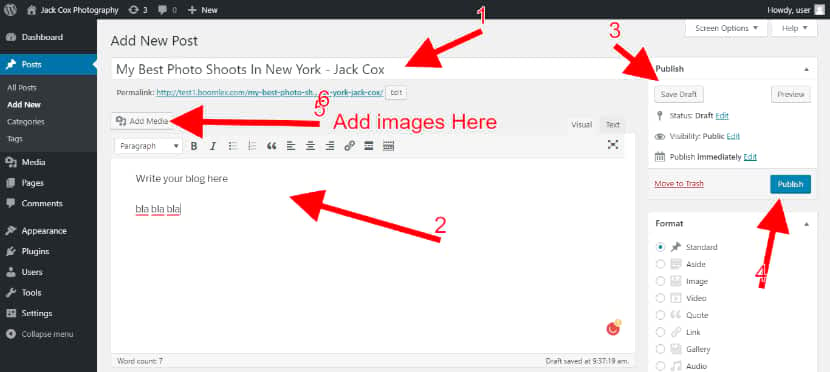
Now post your first blog.
Go to Posts – Add New

add a new blog post
Then you see this empty blog template field. Write your blog title and write the description below.

After I filled the blog content.

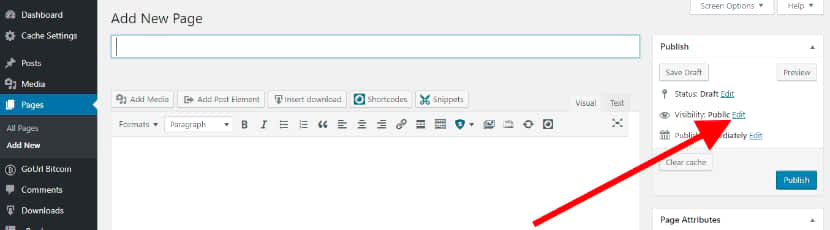
Now Create at least 2 Pages.
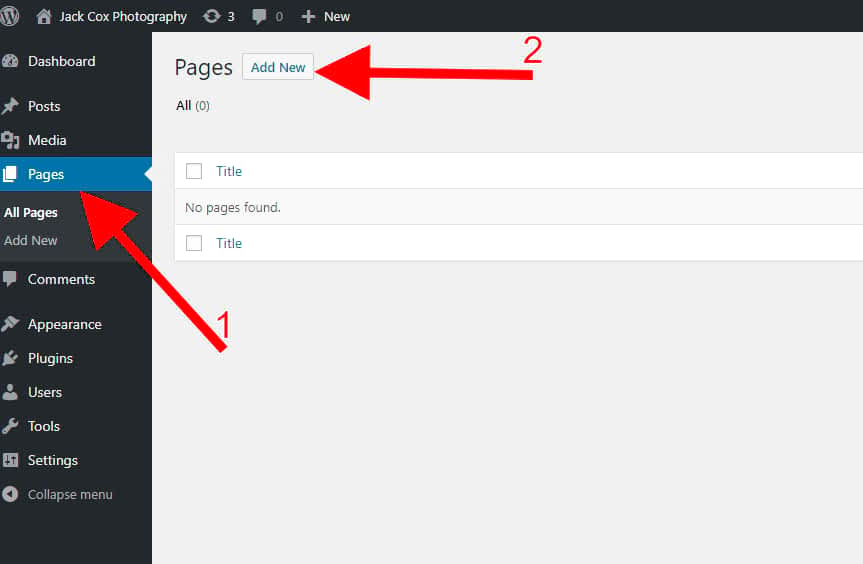
Attention:- If you don’t publish at least 2 pages, then the homepage cannot be created. So you must publish 2 pages. E.g HomePage & Blog page
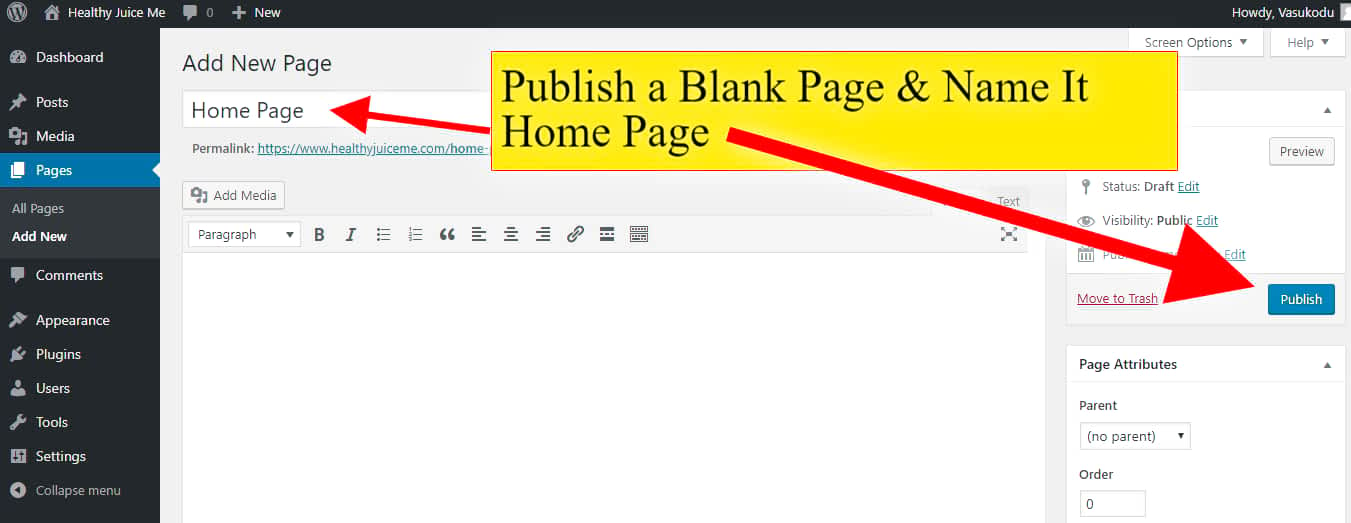
Then Create another blank page, name it as “blog” & publish it. Then you can also create essential pages like
- contact page
- about page
- privacy policy
- Portfolio
- Services
- My News etc.
Just write title & publish as a blank.
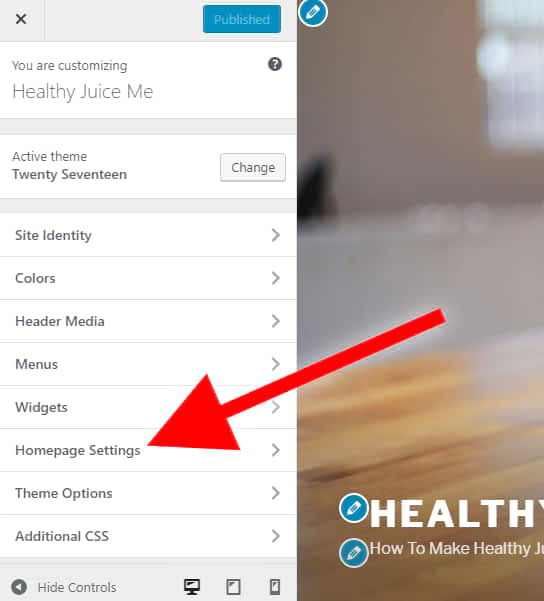
Next, again you need to go to Appearance – Customize – Homepage Setting
Next, you will see your homepage displays option. Select a static page.
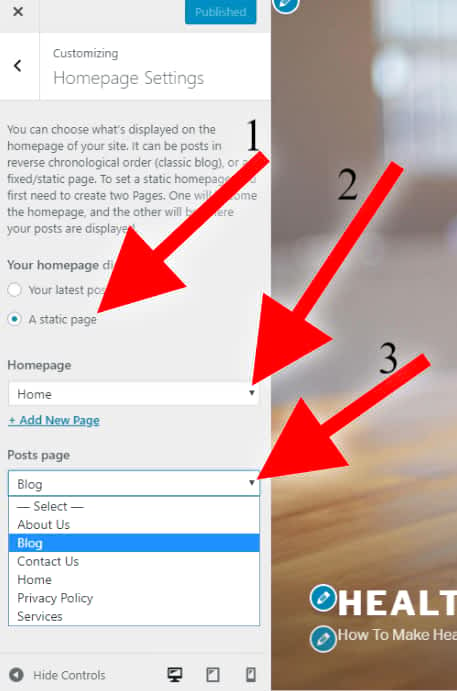
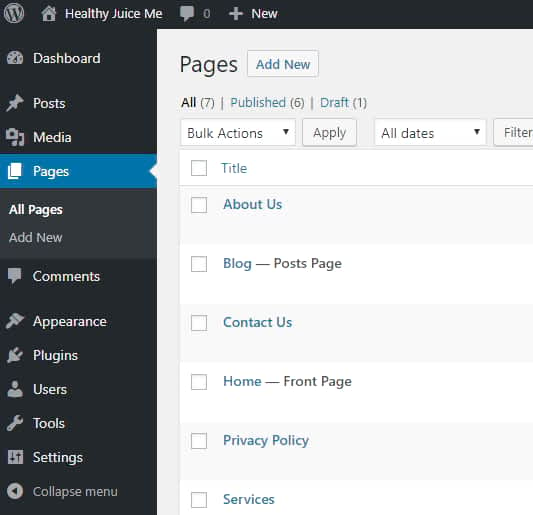
Next, come back to pages. You will see post page & front page labels. Because you just selected front page & post page on the homepage setting.
Now whatever you edit on the home or front page, appear on your website home.
Ok. Now Let’s create a homepage.
Oh.. !This is a website. You need a lot of web functions
Get Drag & Drop Website Builder
Time Required – 10 Minutes to learn, after that it depends on how you build. Generally 15 Minutes enough to create an amazing web page.
You can Install many website builders on SiteGround-WordPress Site Creation platform & turn it into easy drag and drop site builder more powerful than Wix, Weebly, Squarespace etc put together..!
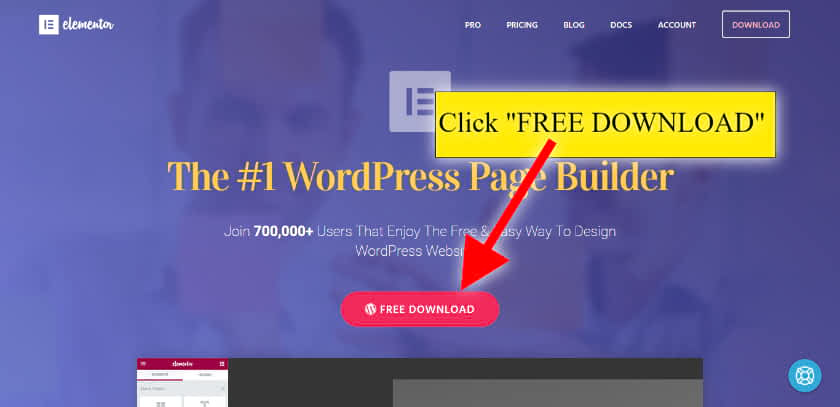
One of the best free site builder plugin is Elementor.
Go to Elementor
Then download the plugin. & It is FREE…!!! (Do you want more options, more drag & drop web ready-made functions? Then you should download its premium version plugin – Elementor Pro (This Is 50% Off Link)
For more info: See Elementor 100’s Of Features
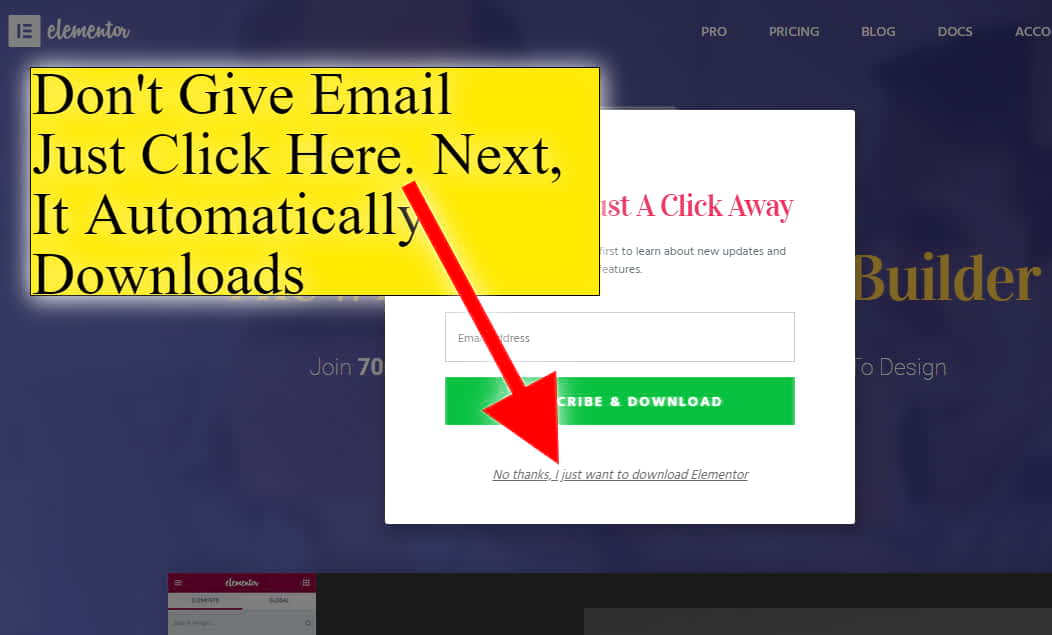
Next a popup will show you to submit your email & download. BUT DON’t Give your email. Just click below option “No thanks, I just want to download Elementor” Once you clicked, then automatically it starts to download.
Its size is just 2 MB. It will be in Zip file. But don’t extract. After the download, go to plugins – add new
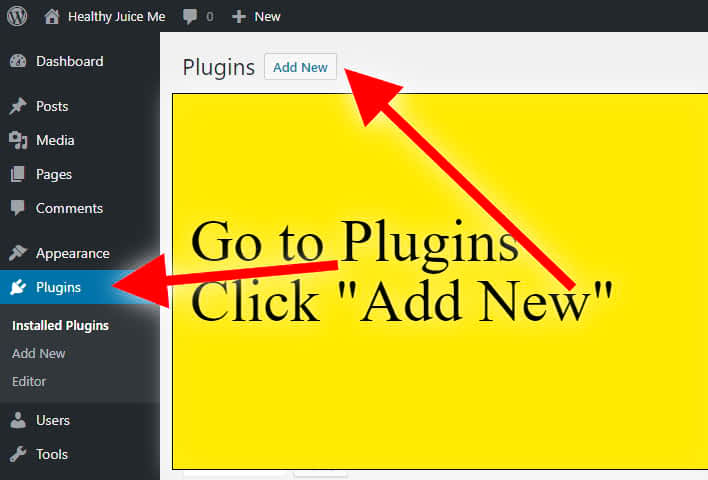
next click upload plugin
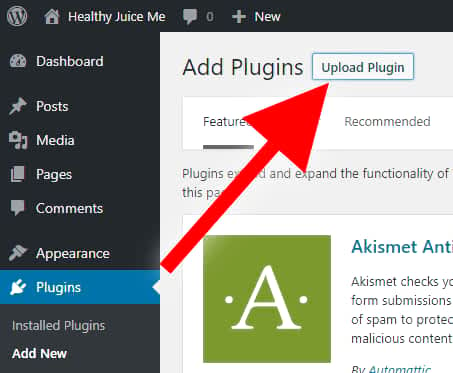
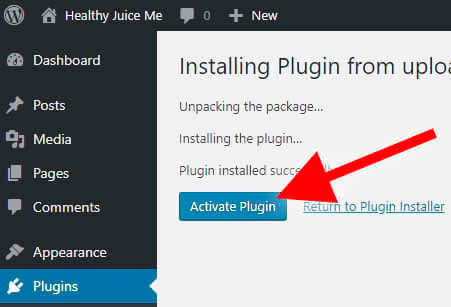
Next, you will see choose file. Click Choose file, then select element zip file that you just downloaded. Then click install.

It takes some time to upload & install. Once it is installed, you will see activate button. Click Activate.
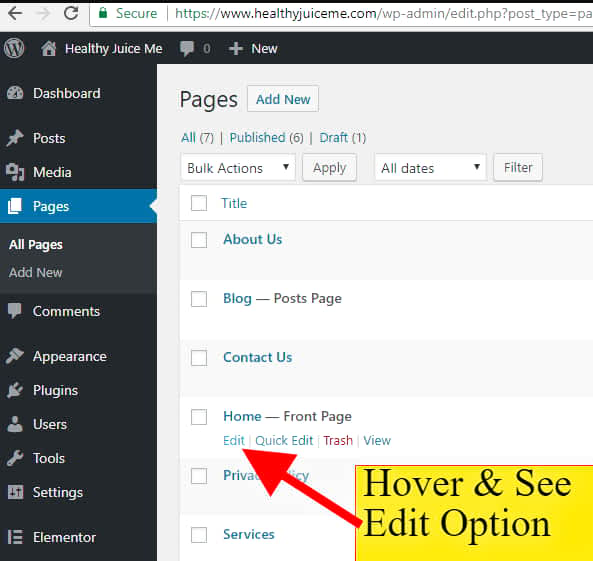
Once it is activated, go to pages & hover on the front page. Then you will see Edit option. click Edit.
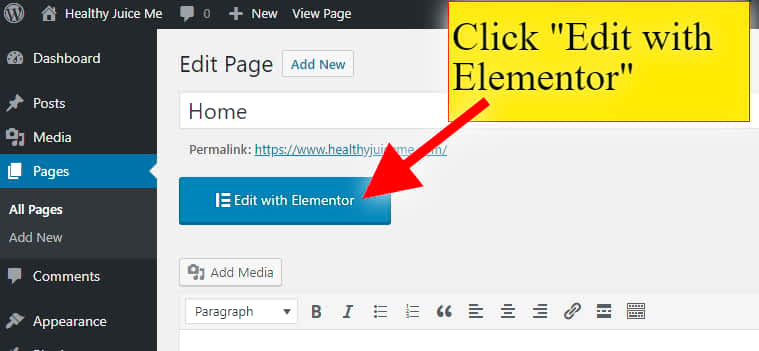
Then you will see again the same boring editor, but you also see one new option – “Edit with Elementor”
Click “Edit with Elementor” to get easy drag and drop web editor with lots of ready-made web functions & templates for FREE.
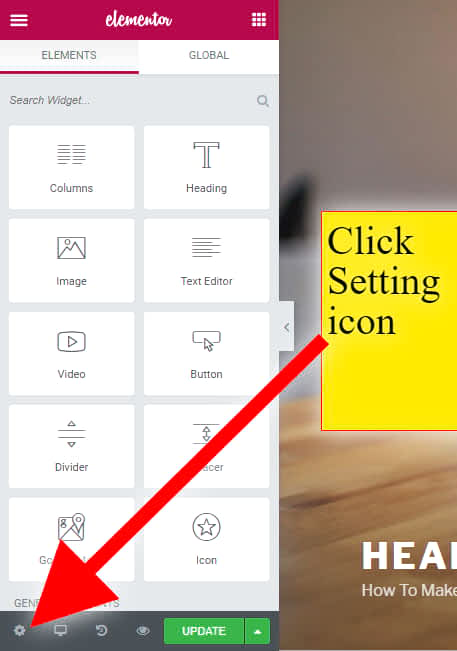
It takes some time to load.
Then click setting icon.
Click Page layout – Elementor Canvas
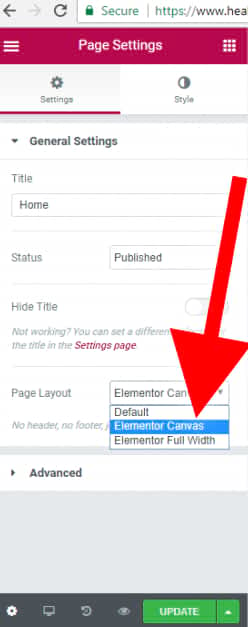
After you selected Elementor Canvas Page layout, update it. A blank web page will create and default pre-loaded contents & everything will be removed. Next, you can create anything with your imaginations.
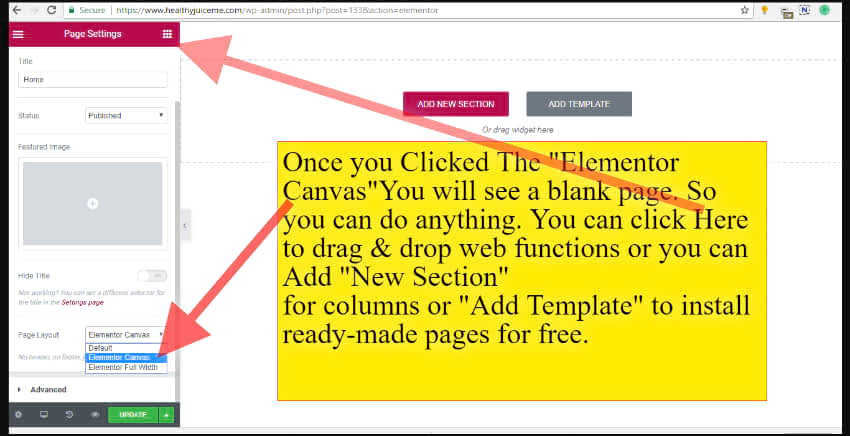
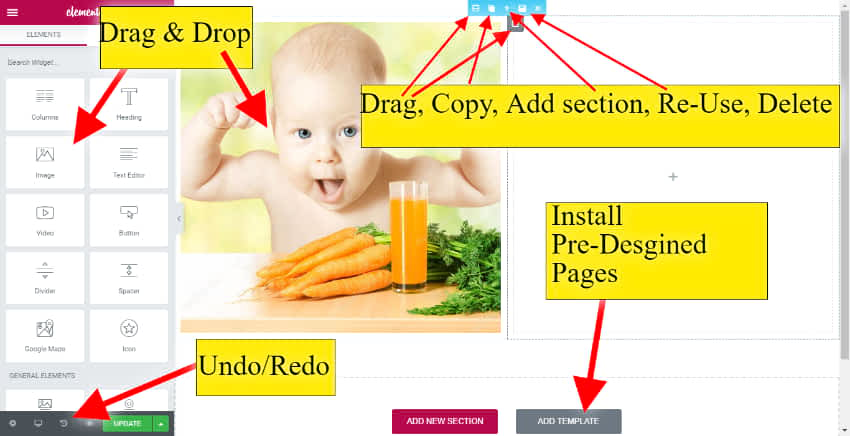
Drag & drop elements from the left menu to right page editor.
You should update whenever you made changes. If you close your browser without the update, then your work will delete.
You can install pre-designed pages by clicking add template
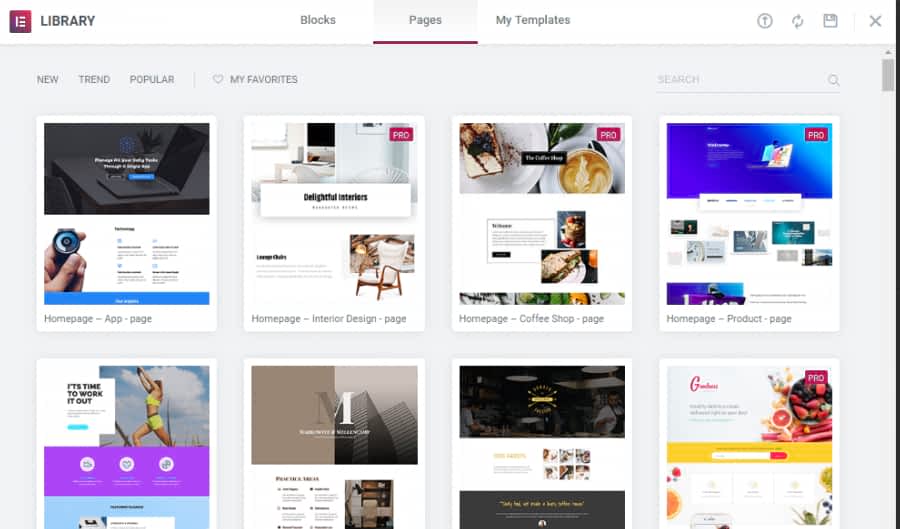
After you can edit the pre-designed pages as your wish. You can change or add or delete anything.
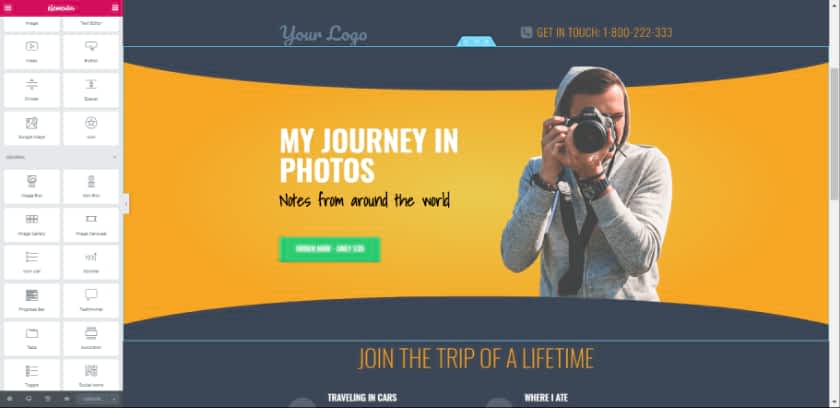
I installed a photography template. Within 5 seconds I created a new photography website..! Here is its screenshot. You can add or change the text, photos or any design in this ready-made template.
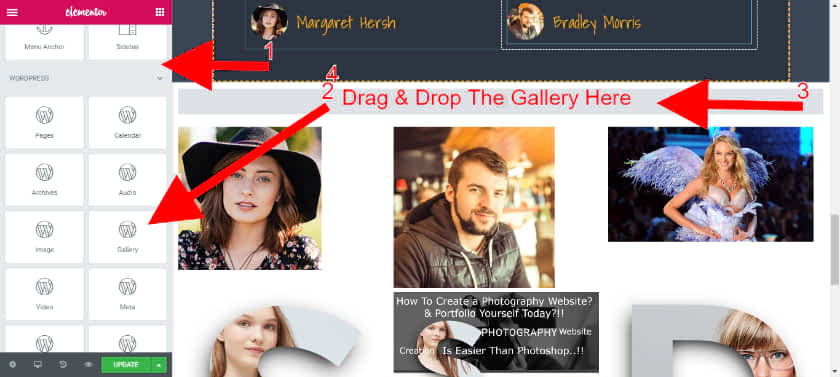
You can add your image gallery to here.
Go to WordPress- Gallery & drag & drop to the page side.
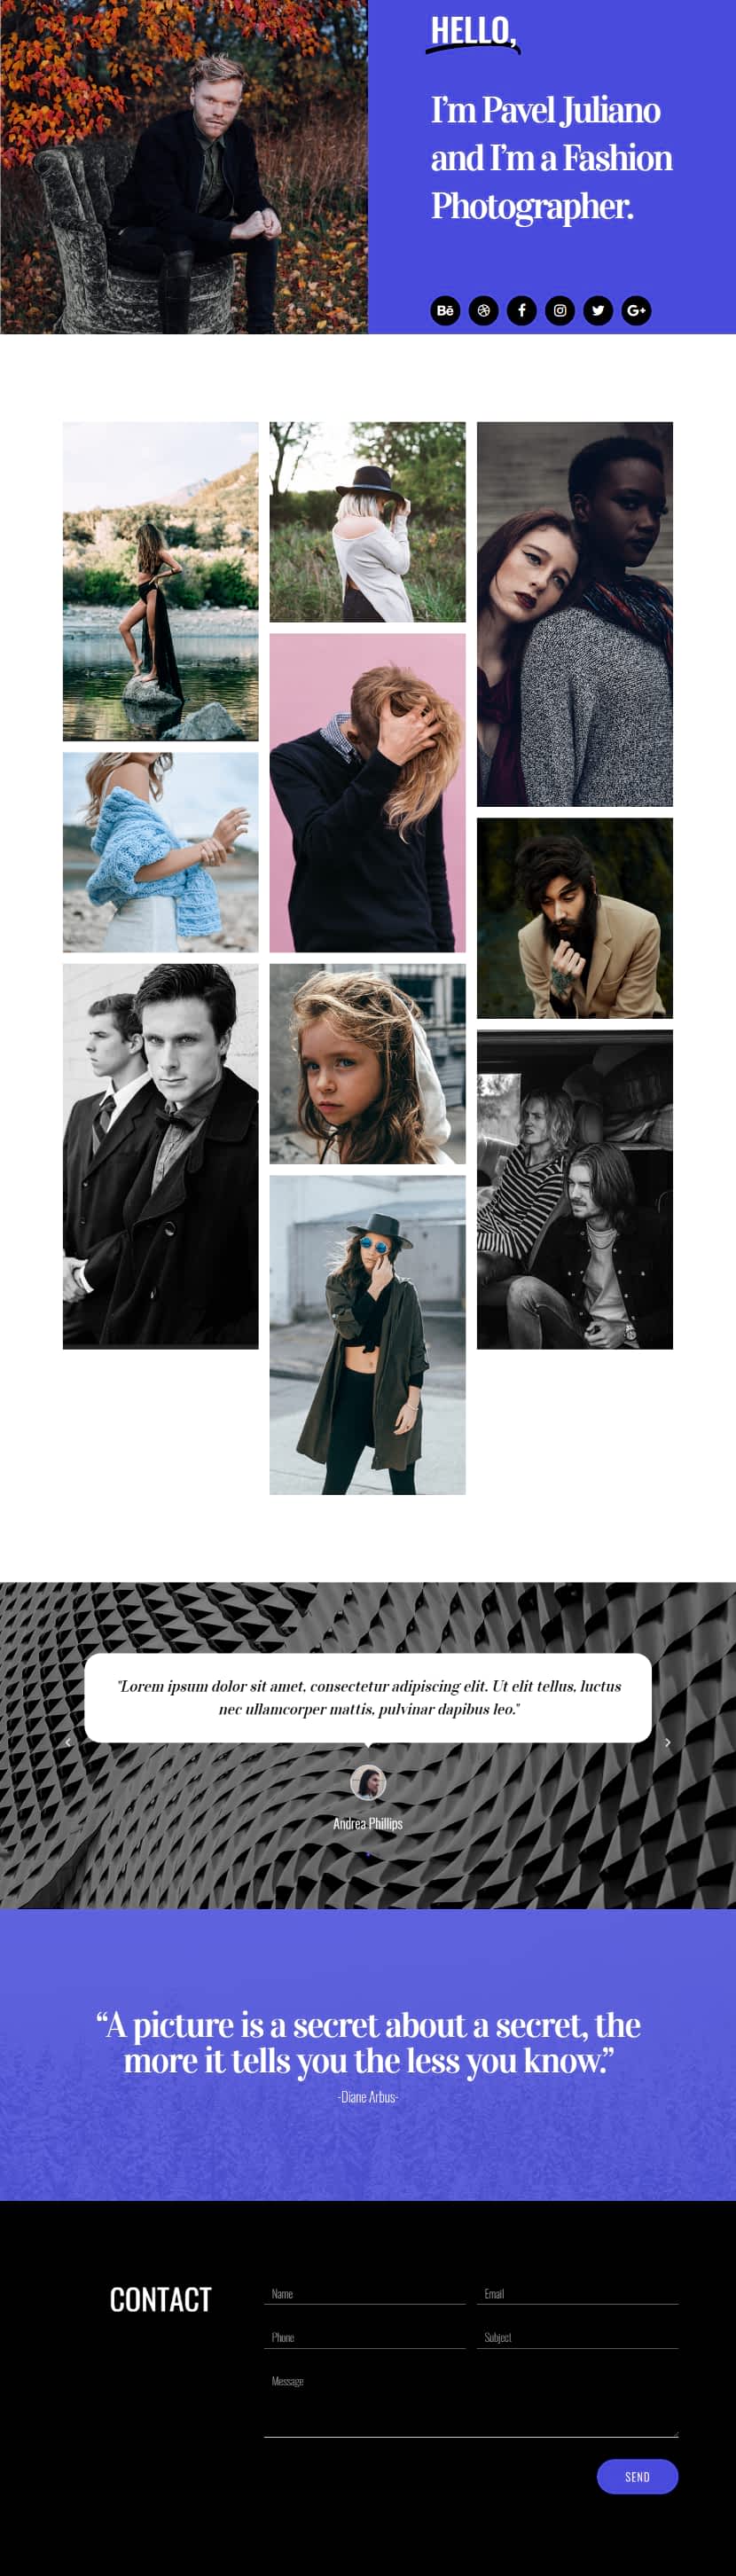
Here is another example. I installed a photography portfolio ready-made page template on another page.
Now your website is created. But if you want to add more functions to your website, then just install the plugins you want. How? See next step below.
6.Install Photography Related Plugins To Add More Functions
WordPress real power comes from its Plugins.
This is WordPress and you can imagine any function, then there is a ready-made plugin available for you & most of them are free. But don’t install too many like 50 or 100 plugins, It makes the website heavy and affects site loading speed.
Now you can search any plugin you want. For example, if you want Pinterest pin button on all your photos automatically on your website, then just type “Pinterest pin for images”, You will see 100’s of Pinterest related plugins..! Test which one you like. I recommend you to install the plugins with good reviews & with more download counts.
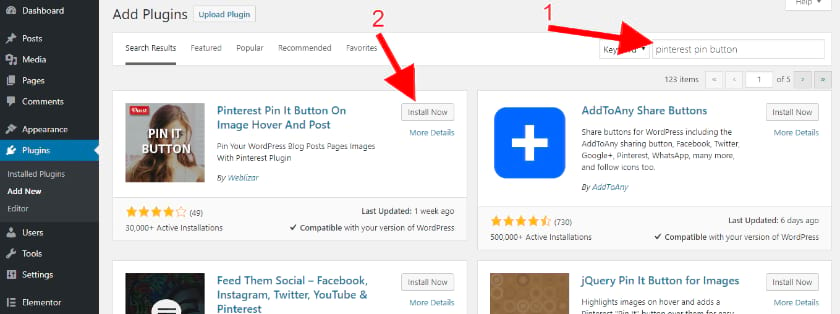
Click Install.
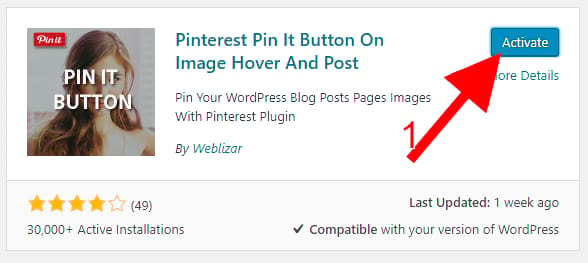
Then you will see Activate Button. click Activate.
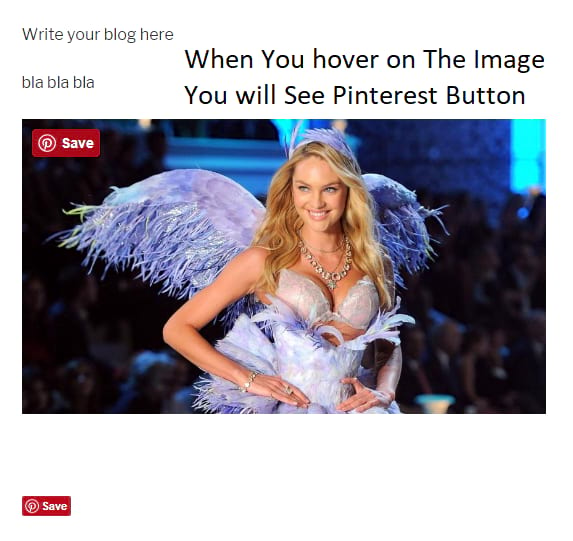
Once you activated, then you no need to do anything. It automatically applies to your entire website..! If you hover any images on your website, then you will see Pinterest pin it or save buttons.
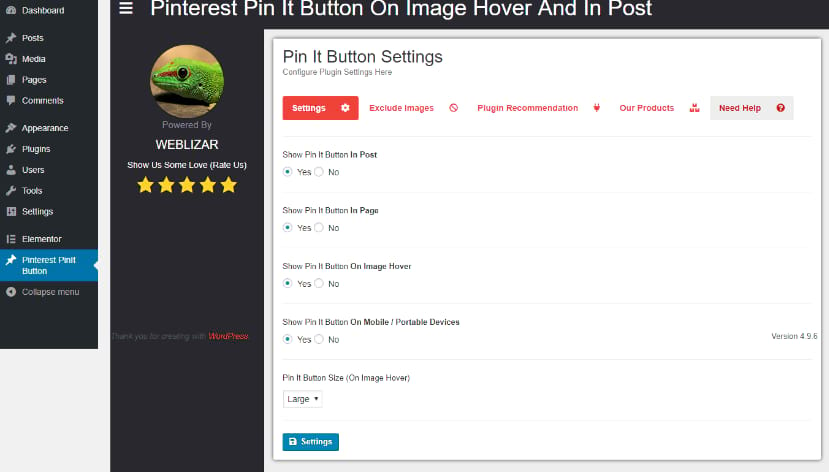
You can change the settings you want here.
Do You Want To get more photography related functions? Just type it. Activate the plugin you want.
Don’t install Gallery like plugins, Because, it is already there in the Elementor. don’t install unnecessary plugins just because it is free. Install the plugins that you really need.
Do you want social share buttons just like mine?
Just type social share, and you will get a lot of share bar plugins.
Do you want different galleries? Search Gallery plugins for WordPress, you will get many gallery plugins.
Do you want to speed up your image loading speed and total website?
Just install Wp fastest cache plugin.
If you got any issues then just deactivate the Wp fastest cache plugin. Because cache plugins sometimes interrupt with other plugins. or take SiteGround team help. They will help you for free. If they don’t, We will fix any your issues just for $2. Because we are so experts & confident, we can solve 99% of the WordPress problems within a few minutes. You can also take our help to customize or develop an amazing photography website to get famous or doing a great photography business.
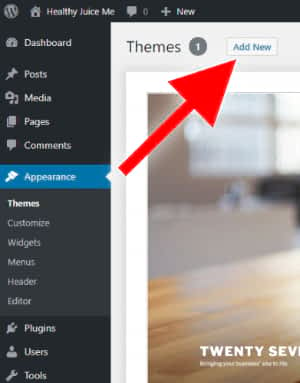
Install Photography Themes/Templates (But Not Necessary)
There are 1000’s of free photography themes available. I don’t recommend free themes. Because almost all themes are simple, similar. I even don’t recommend premium themes. If you install Elementor, you can create almost anything including new theme itself. But there are a few premium photography themes included client proofing and other photographers friendly features. You can find lots of premium photography themes & tons of photographers related items on ThemeForest
I tested 100’s of themes. Finally, I liked these 4 themes.
Once you bought any of them, you can download at anytime & you will get updates forever with 6 month free support. The zip file will download. Don’t unzip.
After downloading any of those themes, you can install that theme’s zip file on your website under the appearance menu.
Click Add new, Then upload
Then click upload theme (Just like how you uploaded and installed plugins that I explained above)
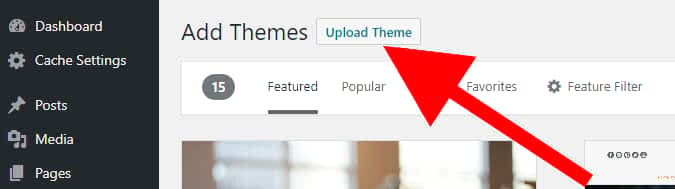
Upload the zip file that you just downloaded & install.
8.Get On Google, Bing Yahoo etc.
Wait
Just wait…!!
Google and all other search engines are evolved so advanced, you no need to submit your website..! They will automatically crawl your website. But it takes some time.
Whenever new pages and posts published, slowly it will get index. It takes more than a week for new websites. Once your website started to receive traffic, then your small changes will also get index quickly like within a day or hours. In general, You no need to do anything.
But if you want to get your website index systematically, then there are many WordPress SEO plugins available for Free. I recommend Yoast plugin.
Yes. you are done…! now your website is available online. Sometimes Google takes at least 2-3 weeks to show in its all search results. But you can share your website link with your friends without waiting for the Google index.
If you want to get on Google as soon as you published, then you can submit your website to Google easily.
If you want to take your website even more functional or want to sell your prints, canvas, mobile case, photo frames etc, then here are quick steps.
1.Sign Up For Printful.com & It is FREE (Prinful help you to print on things. If you don’t have photo frame services or printing your client’s photos on iPhone case, Canvas, Shirt or any printing on things, Then still you can give those services & make money more & fast.)
2. Install Woocommerce on your website & set it up. (Here is 5-minute easy guide -> Woocommerce set up tutorial)
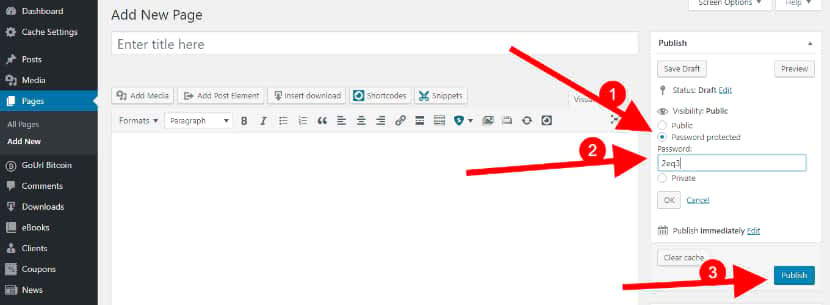
3. Create a page for your client. Set up a password.
4. Create a password & send to your customer with URL.
6. Install Printful plugin & connect to your Printful.com account. Once you installed Printful plugin , you will get its settings on the dashboard & Everything is free.
7. Next, your client can order any of his photos.
8. You just take Coffee & everything will automatic including delivery. You will get the revenue minus the original cost for printing things on Printful
See How To Start An Online Photo Store With No Money & Without Inventory using Printful?
When your customer ordered, then the order sent to both you & Printful. Then Printful will print & deliver. You no need to worry about anything..!! But their company name will not reveal. Your client thinks you delivered the product. You get profit minus the original cost of the material & printing service.
See all options available on the dashboard. You will understand slowly. If you don’t understand, then search for tutorials. there are 100’s of FREE tutorials, videos available. You can master WordPress without any previous knowledge. If you got any problem, comment below & get a response within 24 hours.
[Note: – WordPress is a little difficult. If you want the best & easiest method then click here – How To Make A Photography Website, Web Portfolio, Photo Blog, Art Store, Sell Your Photo Print In USA as well as World-Wide With Automated Deliveries & Everything In 2022 (2 Hours & No Skill Required)]Jack is the Co-founder of WebsitebuilderLy, a Software Engineer from Standford University, An entrepreneur with 12 years of Website Creation, Management, Marketing Automation & App Development Experience. Worked for the world’s leading companies such as Roblox, HTC, etc.


")


")

“Fantastic guide on creating a photography website with WordPress in 2022! ?? Your step-by-step instructions and insights make it seem so achievable. Thanks for sharing your expertise, I’m inspired to start building my own photography site now! ? #PhotographyWebsite #WordPressTips”